
Easy Fermented Coleslaw Recipe for Beginners
If you're looking for a healthier twist on a classic side dish check this detailed recipe with a twist.
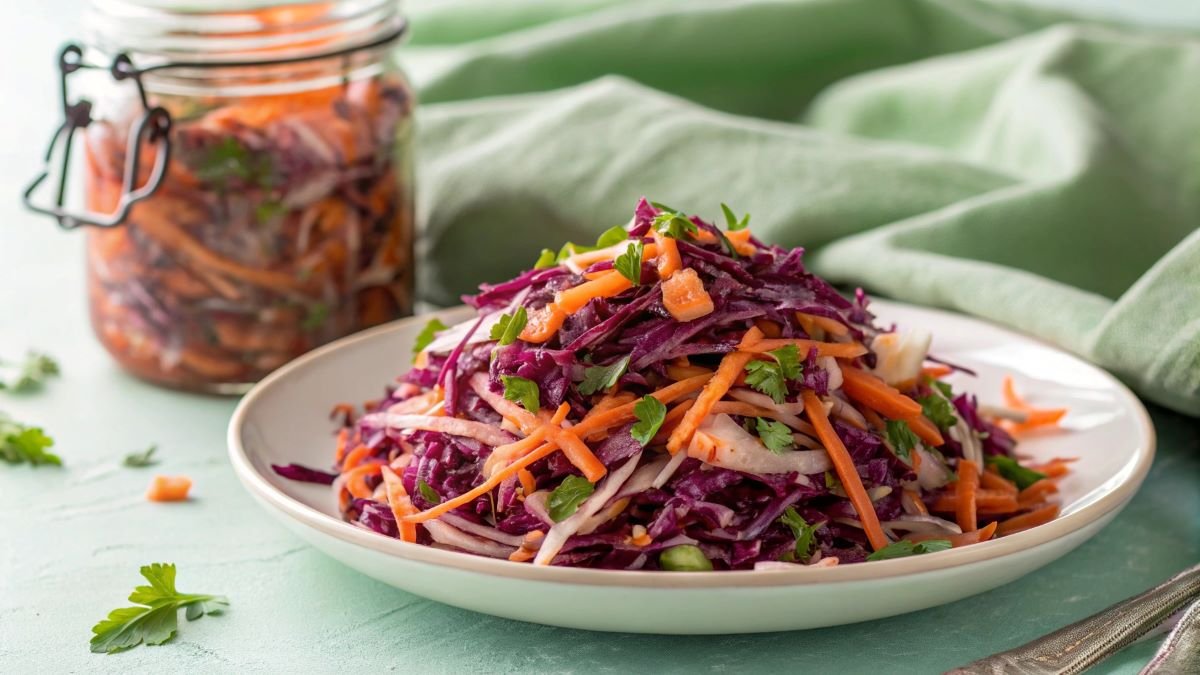
If you’re looking for a healthier twist on a classic side dish, I’ve got just the thing for you: fermented coleslaw. It’s a gut-friendly alternative loaded with probiotics.
To make it, I shred cabbage and carrots, mix them with salt, and let the fermentation process do its magic. You’ll need just a few simple ingredients: cabbage, carrots, sea salt, and optional spices for some extra “zing”.
The fermentation process, which takes 3 to 10 days, transforms the veggies into a tangy delight packed with beneficial bacteria. Once it’s ready, I pop it in the fridge to slow down fermentation and keep it fresh for months.
Here’s how to do it:
Fermented Coleslaw Recipe
This is a very detailed fermented coleslaw recipe (some may find it too detailed), but I consider that apart from novice fermenters, newbies might read as well. Plus, this fermented coleslaw recipe has some variations – inspired by me – compared to other fermented coleslaw recipes found online.
Probiotic-Rich Fermented Coleslaw
Equipment
- 1 Large mixing bowl For tossing veggies and spices.
- 1 Mandoline or sharp knife To thinly slice cabbage and veggies. Use a mandoline for even cuts
- 1 kitchen scale Essential for calculating salt-to-veggie ratio.
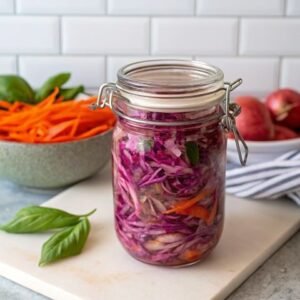
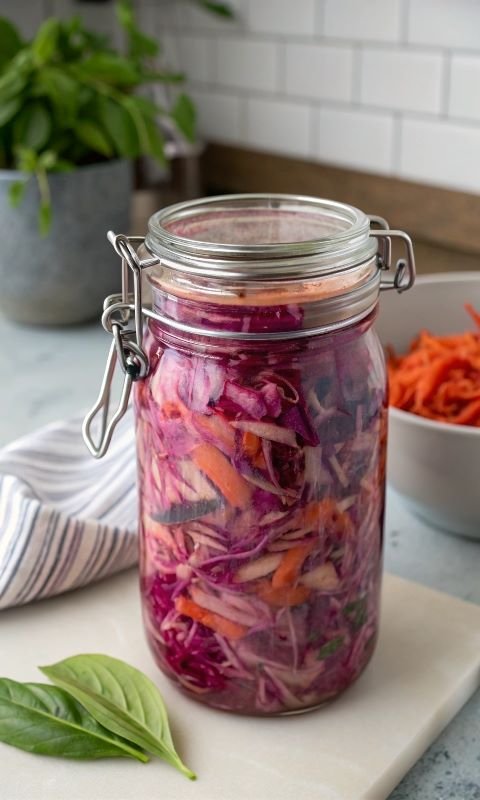
- 1 1-liter mason jar Sterilize with boiling water before use.
- 1 Fermentation weight A small glass jar or ziplock bag filled with water (non-metal!).
- 1 Thin cloth or coffee filter Covers jar to block debris but allow airflow.
- 1 Rubber band Secures cloth over jar.
Ingredients
- 200 g Purple cabbage Shredded (about 1/4 head).
- 300 g Savoy cabbage Shredded (about 1/2 head).
- 2 Chili peppers Deseeded for mild heat, or leave seeds for spice
- 10 g Fresh ginger Peeled and grated (thumb-sized piece).
- 2 cloves Garlic Minced (avoid pre-minced; fresh is key).
- 3 Spring onions Thinly sliced, including green tops.
- 2 medium Carrots Julienned or grated for sweetness.7
- 2 tsp Fennel seeds
- 1 tsp Mustard seeds Adds subtle tang and texture.
- 15 g Non-iodized salt Sea salt or pickling salt (critical for fermentation).
- Filtered water Chlorine-free (boil and cool tap water if needed).
Instructions
Prep the Vegetables
- Shred the cabbage: Remove tough cores, then slice cabbages into thin strips using a mandoline or knife.
- Prep aromatics: Grate ginger, mince garlic, slice chilies (wear gloves!), and julienne carrots.
- Mix: Combine all veggies, ginger, garlic, chilies, and seeds in a large bowl. Toss to distribute evenly.
Weigh and Pack
- Weigh mixture : Place veggies in a bowl on a scale. Note the total weight (e.g., 500g).
- Pack the jar : Transfer veggies to the sterilized mason jar, pressing firmly with a spoon or clean hands to remove air bubbles. Leave 1–2 inches of space at the top.
Make the Brine
- Calculate salt : For every 100g of veggies, use 2.5g salt (e.g., 500g veggies = 12.5g salt).
- Dissolve salt : Mix salt into 2–3 cups of warm filtered water until fully dissolved. Pour brine over veggies until fully submerged.
Ferment
- Weight the veggies : Place fermentation weight (e.g., small jar or water-filled bag) on top to keep veggies underwater.
- Cover : Secure cloth over the jar with a rubber band. Label with the start date.
- Store : Keep at room temperature (65–75°F / 18–24°C) for 5–7 days . Check daily: press down veggies, skim off any scum, and ensure no mold forms
Store and Serve
- Refrigerate : Once tangy (taste after 5 days), remove the weight, seal the jar, and refrigerate. Flavors will mellow.
- Serve : Enjoy chilled as a side or on sandwiches.
Video
Notes
- Salt Matters: Use non-iodized salt—iodine can inhibit fermentation.
- Salt Substitution: If fine sea salt is unavailable, use kosher salt at a 1:1 ratio, guaranteeing it’s without additives like iodine which can hinder fermentation.
- Mold Alert: If fuzzy mold appears (not just cloudy brine), discard the batch. Always guarantee the cabbage remains submerged under the brine to avoid mold growth; use a fermentation weight or a smaller jar to press down if necessary.
- Flavor Boost: Add 1 tsp turmeric or 1 tbsp sauerkraut juice for extra probiotics. Experiment with different spices like caraway seeds or mustard seeds during the initial mix to add unique flavors to your fermented coleslaw.
- Too Salty? Rinse a small portion before serving.
- Texture Fix: Add toasted nuts or jicama before serving if veggies lose crunch.
- Crave Mayo? If you crave creaminess, ferment the veggies first (5–7 days), then stir in mayo or a yogurt-mayo blend right before eating . This balances probiotic benefits with classic coleslaw flavor!
- Fermentation Time: Taste the coleslaw daily after the third day; fermentation speed can vary with room temperature, so trust your taste to decide when it’s ready.
History of Fermented Coleslaw
Fermented coleslaw is a blend of traditional food preservation and modern dietary practices focused on gut health. The idea of preserving cabbage through fermentation dates back thousands of years, with evidence of similar dishes in ancient Roman and Chinese cuisines.
The term “coleslaw” comes from the Dutch “koolsla,” meaning cabbage salad (“kool” = cabbage, “sla” = salad) which was brought to America by Dutch immigrants. While rooted in Dutch cuisine, coleslaw has evolved globally, often incorporating local ingredients like carrots, apples, or spices
In the past, people fermented cabbage to keep it fresh during winter months. This process involved letting natural bacteria on the cabbage convert sugars into acids, creating a tangy flavor and preserving the food. Today, fermented coleslaw is made by shredding cabbage, adding salt, and letting it ferment for several days. This creates a probiotic-rich food that’s different from traditional coleslaw made with mayonnaise or vinegar.
Fermented coleslaw is part of a broader family of fermented cabbage dishes found worldwide, such as German sauerkraut (“sour cabbage”) and Korean kimchi. Each culture has its own version, reflecting local ingredients and preferences. The fermentation process not only preserves the cabbage but also enhances its nutritional value and introduces beneficial bacteria that can aid digestion.
Fermented Coleslaw Nutritional Facts Per Serving
Fermented coleslaw is a low-calorie, nutrient-rich side dish that supports gut health with its probiotics. It is suitable for those following low-carbohydrate diets, especially when prepared without added sugars. The following table presents the estimated nutritional values for a typical serving of fermented coleslaw as researched by Perplexity Ai.
| Nutrient | Amount per 1 cup serving | % Daily Value* |
|---|---|---|
| Calories | 40-45 kcal | 2% |
| Total Fat | 1.6 g | 2% |
| Saturated Fat | 0.2 g | 1% |
| Protein | 0.8 g | 2% |
| Total Carbohydrate | 6-7 g | 2-3% |
| Dietary Fiber | 2 g | 7% |
| Total Sugars | 5-6 g | – |
| Sodium | 100-400 mg** | 4-17% |
| Potassium | 110 mg | 2% |
| Vitamin C | 20 mg | 22% |
| Vitamin K | 45 mcg | 40% |
| Vitamin A | 220 IU | 4% |
| Calcium | 27-30 mg | 2% |
| Iron | 0.3-0.35 mg | 2% |
| Folate | 16-25 mcg | 4-6% |
*Percent Daily Values are based on a 2,000 calorie diet.
**Sodium content varies significantly based on the amount of salt used in the fermentation process.
Serving Suggestions
Fermented coleslaw is a versatile dish that works well as a side, topping, or even a standalone snack. Here’s how you can serve it to get the most out of its tangy flavor and probiotic benefits.
- Pairs great with grilled foods: First off, this slaw pairs great with grilled foods. Throw it on the side of burgers, hot dogs, or barbecue ribs to cut through the richness of the meat. The tanginess balances out heavier flavors, making it a go-to for cookouts or casual meals.
- Sandwiches: If you’re into sandwiches, fermented coleslaw is a no-brainer. Pile it onto pulled pork sandwiches, Reubens, or even turkey subs for extra crunch and zing. It’s a bit like adding sauerkraut but with more complexity thanks to the mix of veggies and spices.
- Green Salads: For health-conscious eaters, toss it into green salads or grain bowls. The probiotics in the slaw add a gut-friendly boost, while the texture complements softer ingredients like lettuce or quinoa. You can also mix it into fruit salads with raisins or apples for a sweet-and-sour combo.
- Pro tip: if you want creaminess, mix the fermented slaw with mayo or Greek yogurt right before serving. This gives you the best of both worlds—probiotics from fermentation and the classic coleslaw vibe.
- Tacos: Finally, don’t forget about tacos or wraps. A spoonful of fermented coleslaw adds acidity and crunch, which works wonders with spicier fillings like chorizo or black beans.
Frequently Asked Questions
Final Thoughts
That’s it guys.. Let me know if you have any questions ins the comments section below.
As you experiment with fermented coleslaw in your meals, you’ll uncover its incredible versatility and health benefits. The fermentation process introduces probiotics that bolster your gut health, a clear advantage over traditional coleslaw.
Remember, the key to success lies in using the right amount of sea salt—1.5% to 2.5% of the shredded cabbage’s weight. It’s essential to monitor the fermentation by tasting daily and using filtered water to guarantee purity.
Within 3 to 7 days, you’ll notice the flavors maturing and the vegetables softening. Once you reach your preferred taste, refrigerate it to stop the fermentation.
Kept in its brine, your fermented coleslaw will continue to develop flavor and last for months.
More Fermented Recipes: