
Soft Sourdough Sandwich Bread Recipe: The Ultimate Guide to the Perfect Loaf
Ditch the grocery store additives. Here is how to bake soft, squishy, shelf-stable sourdough bread that fits perfectly in your toaster.
Your kid takes one look at your gorgeous artisan sourdough and says, “I want normal bread.”
- The jam slides through the holes.
- The crust scratches the roof of their mouth.
- And the leftover half-loaf turns into a brick by Tuesday.
I get it. I spent years perfecting open-crumb boules before realizing that NOBODY IN MY HOUSE ACTUALLY WANTED THEM FOR SANDWICHES.
This recipe solves that problem.
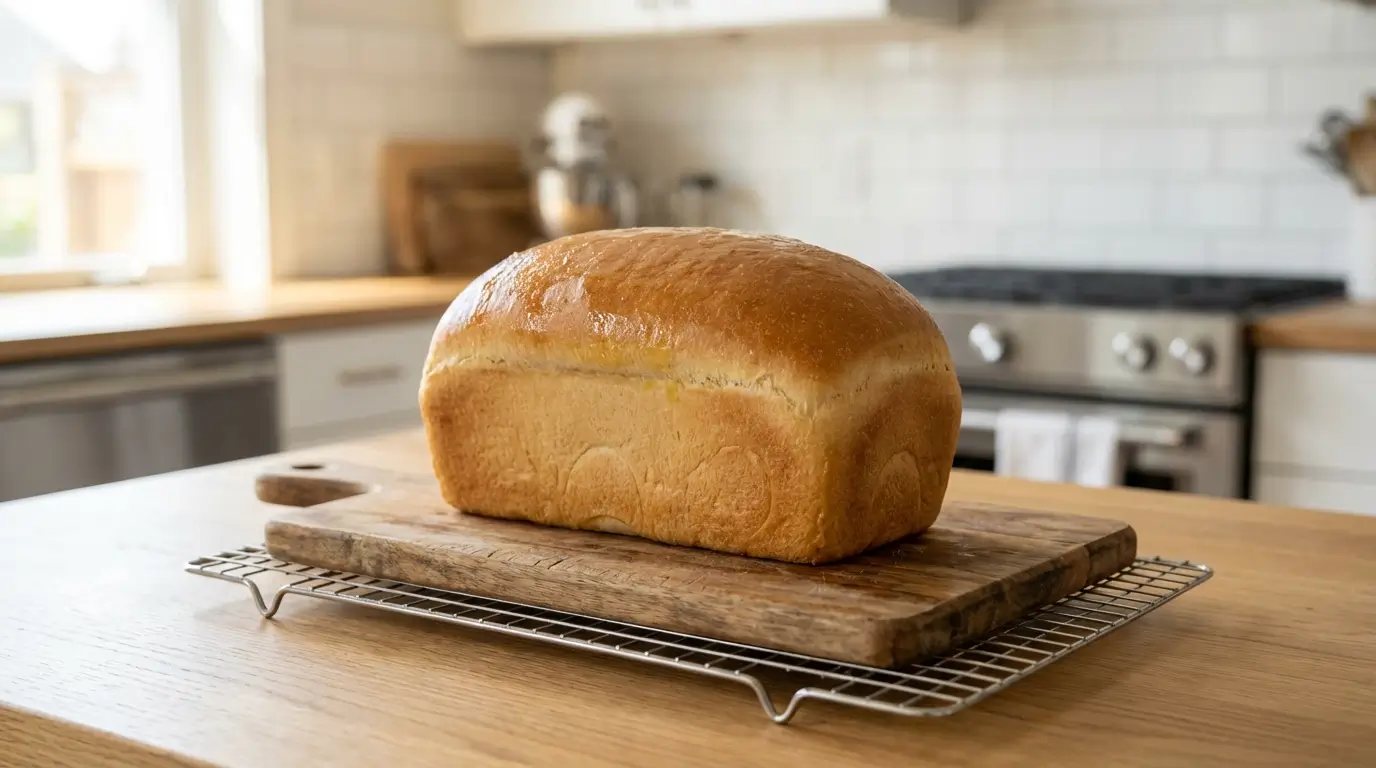
You will get a tight crumb with no tunneling, a paper-thin soft crust, and a shelf life of 4 to 5 days at room temperature without a single preservative.
The dough uses milk, butter, and a controlled fermentation to produce bread that tastes like sourdough but behaves like the stuff from the store.
We are skipping the 3,000-year history of leavened bread. You came here for a recipe that works. So I am going to walk you through the chemistry of softness, give you three different baking schedules, and hand you a formula that accounts for pan size, flour protein, and your local climate.
Let’s get to it.
Why This Recipe Works
Three variables separate a chewy artisan loaf from a pillowy sandwich slice. You need to understand each one to control the result.
Essential Equipment for Sandwich Loaves
With the chemistry covered, let’s talk about the tools that make this recipe repeatable every single time.
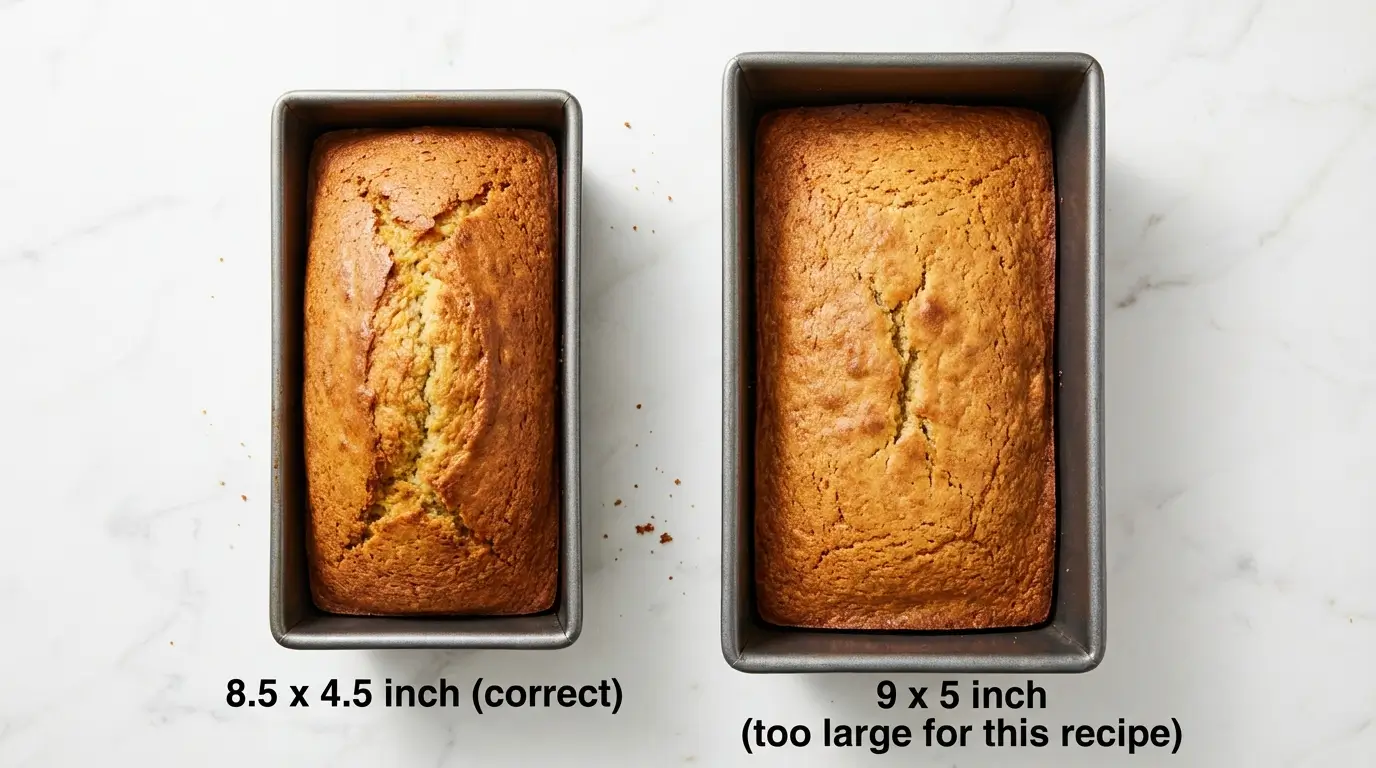
This is the single most common mistake I see from home bakers attempting sandwich bread. Using the wrong pan size produces a flat, squat loaf or one that overflows and collapses.
- An 8.5″ x 4.5″ loaf pan (also called a 1-pound pan) holds approximately 750g of dough. This recipe targets that size.
- A 9″ x 5″ pan needs about 900g of dough, so if that is what you own, scale every ingredient by 1.2 (a 20% increase). If you use a 9×5 pan with the recipe as written, your loaf will bake flat and wide. It will taste fine, but it will not make proper sandwich slices.
- A Pullman loaf pan with a sliding lid produces perfectly square slices. If you want bread that fits neatly in a sandwich bag or toaster slot, a Pullman pan is worth the investment. Bake with the lid on for the first 25 minutes, then remove it for the final 15 minutes to let the top brown.
Flour measured in cups can vary by 20-30% depending on how you scoop [5].
In bread baking, that variance can be the difference between a soft, risen loaf and a dense brick. Weigh everything. Every ingredient in this recipe is listed in grams for that reason.
(Ed. note: If you take away one piece of advice from this entire article, this is the one.)
- A stand mixer with a dough hook speeds up kneading, but you can knead by hand. Expect 12-15 minutes of hand kneading versus 8-10 minutes in a mixer to reach full gluten development.
- A bench scraper helps during shaping.
- A wire cooling rack prevents a soggy bottom by allowing steam to escape from all sides of the loaf after baking.
Ingredients and Substitutions
Now that your kitchen is set up, let’s talk ingredients.
Sample Baking Schedules
With ingredients selected, the biggest challenge remains. When do you actually bake this thing?
“I want to bake sourdough, but I work full-time.”
I hear this constantly. The beauty of sourdough is its flexibility. You can stretch or compress the timeline to fit your day.
Here are three tested schedules.
Sourdough Sandwich Bread Recipe
Equipment
- 1 Digital Kitchen Scale Mandatory for accuracy
- 1 Loaf Pan, 8.5" x 4.5" or 9" x 4" 1 lb loaf pan. If using 9×5, increase recipe by 20%
- 1 Stand Mixer Optional. Can be kneaded by hand, but mixer yields lighter texture
- 1 Bench Scraper For tension shaping
- 1 Cooling Rack Prevents soggy bottom
Ingredients
Levain (Build 4-6 hours before mixing)
- 35 g Sourdough Starter active, bubbly, fed recently
- 35 g Water room temperature
- 35 g Bread Flour high protein
- 10 g Sugar helps yeast activity and reduces sourness
Main Dough
- 450 g Bread Flour 12-13% protein content is ideal
- 260 g Whole Milk warm (approximately 80F / 26C)
- 30 g Sugar or Honey for tenderness and browning
- 9 g Fine Sea Salt non-iodized
- 50 g Unsalted Butter room temperature, soft
- 115 g All of the Levain, approximately 115g from above
Instructions
The Mix
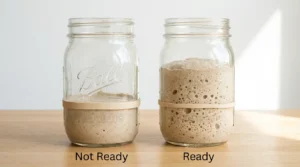
- Check your levain. It should have doubled in size, look bubbly throughout, and pass the float test. Drop a small spoonful into a glass of water. If it floats, the levain is ready. If it sinks, give it another hour.

- In the bowl of a stand mixer, whisk together the warm milk, sugar, and active levain until the starter is mostly dissolved.
- Add the bread flour. Mix on low speed until a shaggy dough forms and no dry flour remains. Stop the mixer.
- Cover the bowl and let the dough rest for 30 minutes. This resting stage is called autolyse. During autolyse, flour absorbs the liquid and enzymes begin breaking down starches. Gluten starts forming passively, which means less mechanical kneading later.
The Strengthen
- Add the salt. Turn the mixer to low-medium speed and knead for 3-5 minutes until the dough gathers around the hook and pulls away from the sides of the bowl.
- With the mixer running on low, add the soft butter one tablespoon at a time. Wait for each piece to absorb before adding the next. The dough will look greasy and broken for a moment. Keep mixing. It will come back together.
- Once butter is fully incorporated, increase speed slightly and knead for 5-8 minutes more. The dough should be smooth, elastic, and slightly tacky.TIP: Perform the Windowpane Test. Pinch off a small piece of dough, about the size of a golf ball. Gently stretch it between your fingers. If you can pull it thin enough to see light through it without it tearing, your gluten is fully developed [8]. If it rips immediately, knead for another 2-3 minutes and test again. Windowpane = the degree to which your gluten network has organized into strong, extensible sheets.

The Rise
- Transfer the dough to a lightly oiled container or bowl. Cover with a lid, damp towel, or plastic wrap. Place in a warm spot at 75F-78F (24C-26C).
- Perform 2 sets of coil folds during the first 2 hours, one set per hour. To coil fold, wet your hands, reach under the dough, and lift the middle while letting the edges fold underneath. Rotate the bowl 90 degrees and repeat. Each set of folds organizes the gluten structure and redistributes temperature and food for the yeast. Dough strength = how well the gluten holds its shape during and after fermentation.
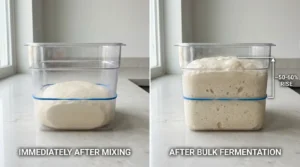
- After the folds, let the dough rise undisturbed until it has increased by roughly 50-60% in volume. The surface should look domed and slightly jiggly when you tap the container. Watch the dough, not the clock. Bulk fermentation can take 4 to 8 hours depending on your ambient temperature and starter strength.
Shape and Proof
- Turn the dough onto a clean, unfloured countertop. Pat it gently into a rectangle, popping any large gas bubbles you see. We WANT a tight crumb for sandwich bread, so do not be afraid to degas. Loosely roll the dough into a log shape. Cover and let it bench rest for 20 minutes. This relaxes the gluten and makes final shaping easier.
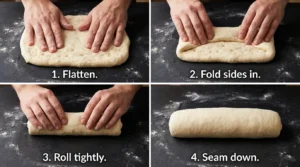
- Flatten the rested dough slightly with your hands. Fold the left and right sides in toward the center, like a tri-fold brochure. Now roll the dough up tightly from the top edge toward you, using your thumbs to push down and create surface tension with each roll. Pinch the bottom seam closed. The tighter you roll, the better your oven spring and crumb structure.
- Place the shaped log seam-side down into a buttered loaf pan
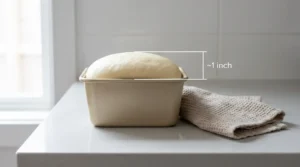
- Cover with a damp towel or reusable shower cap. Let the dough rise at room temperature until the dome crests about 1 inch above the rim of the pan. This takes 2-4 hours at room temperature. If you are using Schedule A or C, cover tightly and place in the refrigerator instead.
Bake
- Preheat your oven to 375F (190C). If baking from the fridge, preheat while the loaf is still cold. There is no need to bring it to room temperature first.
- Place the pan on the center rack. Bake for 35-40 minutes. If the top browns too fast, tent loosely with aluminum foil after 20 minutes.
- Check the internal temperature. The bread is done when a probe thermometer inserted into the center reads 200F-205F (93C-96C). Do not guess. An underbaked center will be gummy and dense even after cooling.
- Remove from the oven. Immediately brush the top crust with a thin layer of melted butter. This seals the surface and keeps the crust soft.
- Remove the loaf from the pan immediately and place it on a wire cooling rack. DO NOT SLICE FOR AT LEAST 2 HOURS. I know this is painful. I know the bread smells incredible. But the interior is still cooking. Starch molecules are re-crystallizing and setting up. If you cut too early, you release steam, collapse the crumb, and get a gummy center.


Notes
- Sourness control. For a milder, kid-friendly flavor, bake the loaf right after the room temperature final proof. For more tang and complexity, cold-proof the shaped loaf in the fridge overnight and bake straight from cold the next morning.
- Milk substitutes. Water produces a chewier crumb and harder crust. Oat milk and soy milk work as 1:1 replacements with minimal texture change.
- Pan sizing. This recipe fills an 8.5″ x 4.5″ pan properly. If using a 9″ x 5″ pan, multiply all ingredients by 1.2 to fill the larger pan and avoid a flat loaf.
- Seasonal adjustments. In summer, use cold milk (straight from the fridge) to keep dough temperature down during mixing. In winter, warm the milk to 85F to compensate for a cooler kitchen.
- Storage. Keep in a sealed plastic bag at room temperature for up to 4 days. Freeze individual slices for up to 3 months. NEVER store bread in the refrigerator. (I will explain why in the next section.)
How to Achieve the “Supermarket Soft” Crust
Understanding the bake is only half the equation. What you do AFTER the oven matters just as much.
“Why is my homemade bread always crustier than store-bought?”
Commercial sandwich bread contains dough conditioners, emulsifiers, and mono- and diglycerides that keep the crust artificially soft.
You do not need any of that. Three techniques get you close to that same softness.
- Brush butter on the crust the second it leaves the oven. The hot surface absorbs the fat, which prevents moisture from escaping through the top. This single step transforms a crackly crust into a pliable one.
- Wait for the starch to set before slicing. When bread cools, its starch molecules undergo retrogradation. Retrogradation = the process where gelatinized starch (soft, pliable) re-crystallizes into a firmer, more organized structure [9]. This is what gives cooled bread its sliceable texture. If you cut during this phase, you interrupt the process and end up with a gummy interior. Two hours of cooling is the minimum.
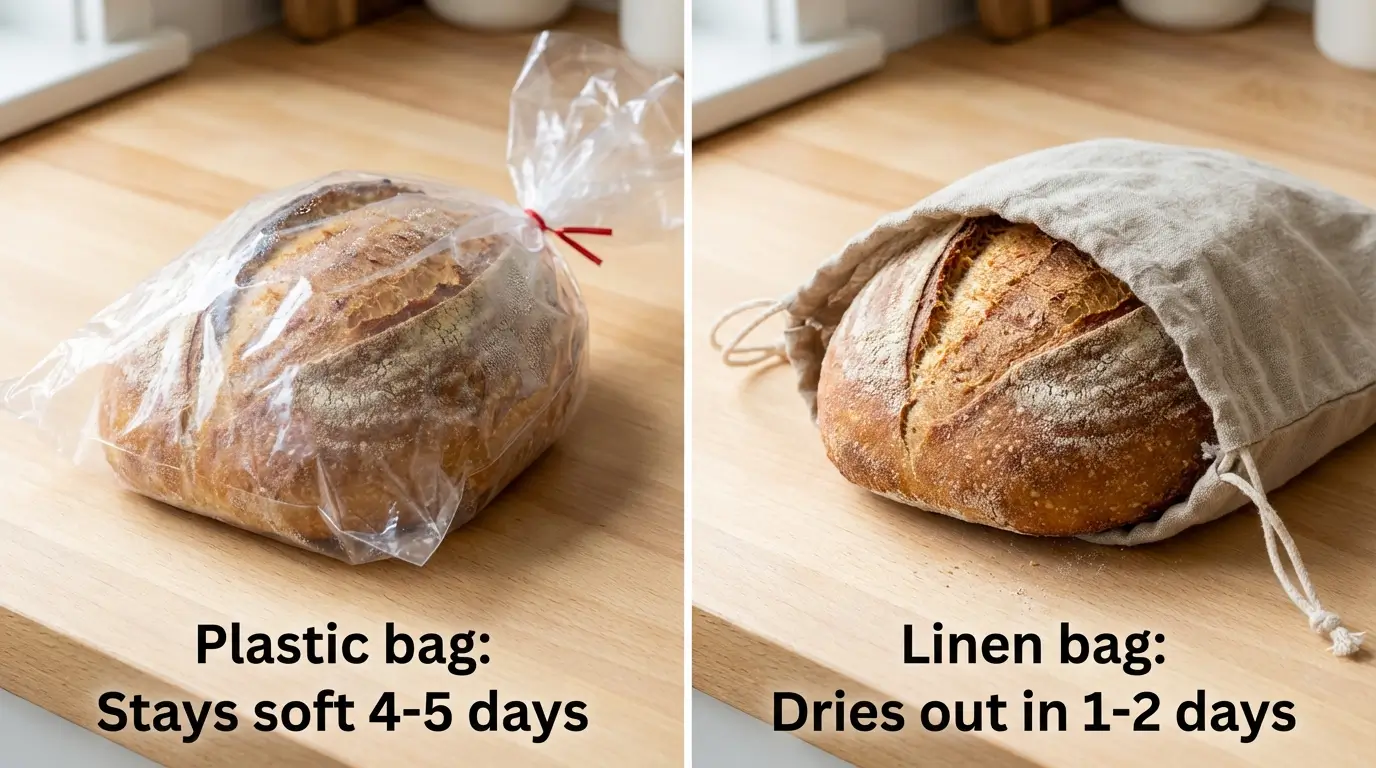
- Store in plastic, not linen. A linen bread bag lets moisture escape, which is great for crusty artisan loaves. For sandwich bread, you want to TRAP that moisture. A sealed plastic bag or reusable silicone bag keeps the crumb soft for 4-5 days. Sourdough fermentation produces organic acids (lactic and acetic) that naturally slow starch retrogradation, which is why sourdough sandwich bread stays softer longer than conventional yeast bread [4][10].
And one storage rule stands above all others.
Never refrigerate your bread. Starch retrogradation accelerates fastest at refrigerator temperatures, between 32F-41F (0C-5C) [11]. Your bread will stale in the fridge 2-3 times faster than on the counter.
If you cannot eat it within 4 days, freeze it. Freezing halts retrogradation entirely. Slice before freezing so you can pull individual slices as needed and toast them directly from frozen.
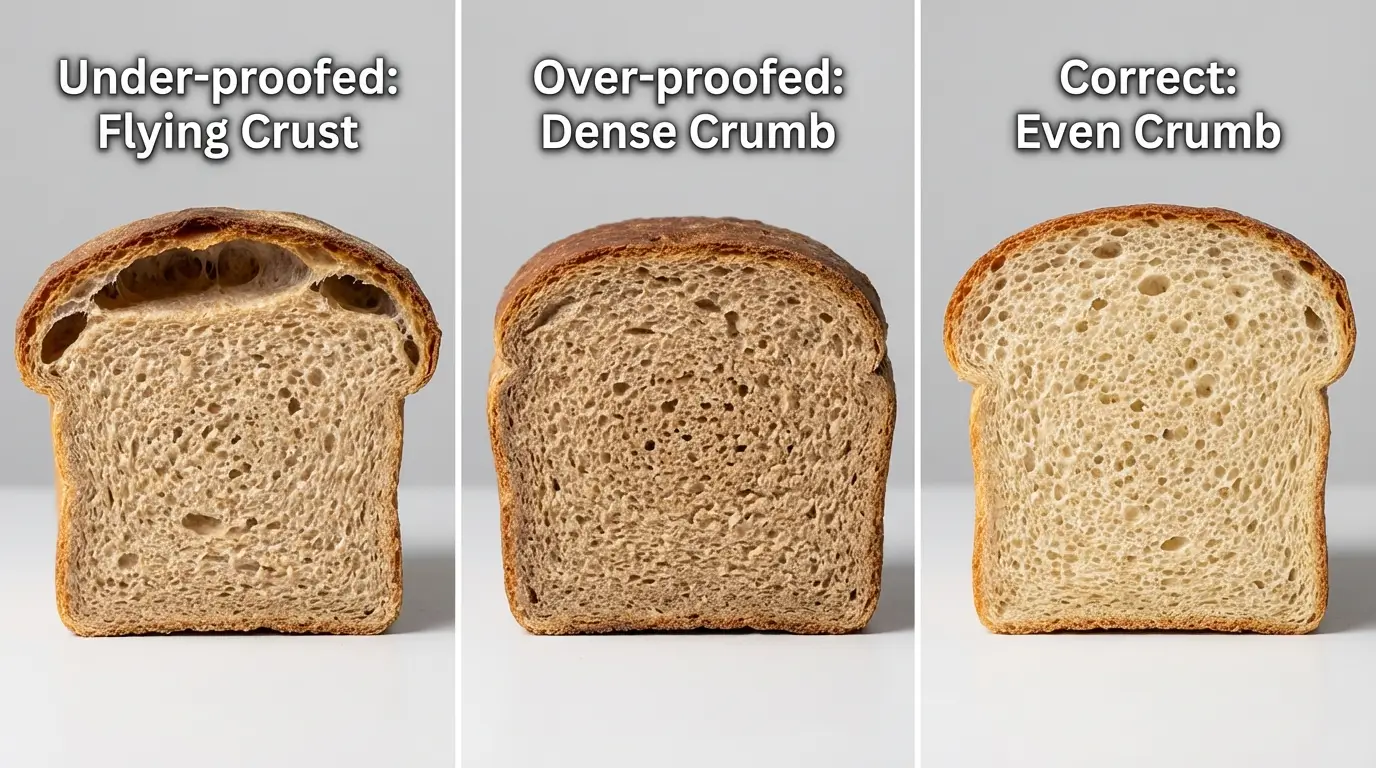
Troubleshooting Common Issues
Even with perfect technique, problems happen. Here is how to diagnose and fix the most common ones.
Frequently Asked Questions
Final Thoughts
This recipe gives you a framework. Your kitchen, your flour, your starter, and your local climate will all create small variations from bake to bake.
Treat the hydration percentage as a starting point.
If your dough feels too stiff, add 10-15g more milk next time.
If it feels too slack and sticky, reduce by the same amount.
The best sourdough sandwich bread is the one your family eats. Keep notes. Adjust. And the next time your kid asks for “normal bread,” hand them a slice of this.
Sources
- [1] Serious Eats, “What Is Gluten? The Science Behind Great Dough”, accessed 2025.
- [2] ScienceDirect, “Effect of sugar on bread dough aeration during mixing”, Journal of Food Engineering, 2015.
- [3] The Sourdough Journey, “FAQ: Open Crumb and Crust”, accessed 2025.
- [4] PMC/NIH, “Sourdough Bread Quality: Facts and Factors”, Foods, July 2024. DOI: 10.3390/foods13132132.
- [5] King Arthur Baking, “Protein percentage in flour: Why it matters”, September 2023.
- [6] King Arthur Baking, “Protein percentage in flour: Why it matters”, September 2023.
- [7] PMC/NIH, “Bovine Milk Fats and Their Replacers in Baked Goods: A Review”, Foods, September 2019.
- [8] King Arthur Baking, “What is the windowpane test for bread dough?”, October 2022.
- [9] BAKERpedia, “Staling”, accessed 2025.
- [10] ScienceDirect, “Effects of sourdough on bread staling rate: From the perspective of starch retrogradation and gluten depolymerization”, Journal of Cereal Science, 2024.
- [11] PMC/NIH, “Influence of Storage Temperature on Starch Retrogradation”, Foods, February 2024.
More Recipes
- Easy Jambalaya Recipe
- Homemade Vegetable Bouillon Cube Recipe
- Starbucks Medicine Ball Recipe
- Lemon Ginger Water Recipe
- Natural Lung Detox Recipe
- Strong Parasite Cleanse Drink Recipe
Under “Ingredients” ” Main Dough” it says, “450 g room temperature, soft All of the Levain, approximately 115g, from above 12-13% protein content is ideal” . Do you mean 450 g Bread Flour?
Hello Emi,
Thank you for pointing that out.
We’ve made the correction. Thanks again.