
Standing Abs Workout for Women: 15 Exercises You Can Do Anywhere
Build a stronger core in 10 to 20 minutes without getting on the floor.
Traditional ab exercises have a problem. Crunches strain your neck. Planks aggravate your wrists. And getting down on the floor feels inconvenient when you’re squeezed for time, working in a small space, or dealing with back pain that makes supine (face-up) exercises uncomfortable.
A standing abs workout for women solves all of that. You train your core upright, using your own body weight against gravity, with zero equipment required.
This guide gives you 15 exercises, three ready-made routines (7-minute, 15-minute, and 20-minute options), a breakdown of every muscle involved, and direct answers to the questions most workout guides skip, like how long until you actually see results and which exercises are safe after pregnancy.
Every exercise works at home, at the gym, or in your office. Pick a routine and start today.
Why Standing Abs Exercises Work Better Than You Think
Most women associate core training with lying on a mat. But standing core exercises recruit more total muscle per rep because your body has to stabilize itself without the floor’s support.
When you perform a crunch on the ground, the floor carries much of your body weight.
Your rectus abdominis (the “six-pack” muscle running down the front of your abdomen) does most of the work, while your back, hips, and legs stay relatively passive.
Standing changes that equation.
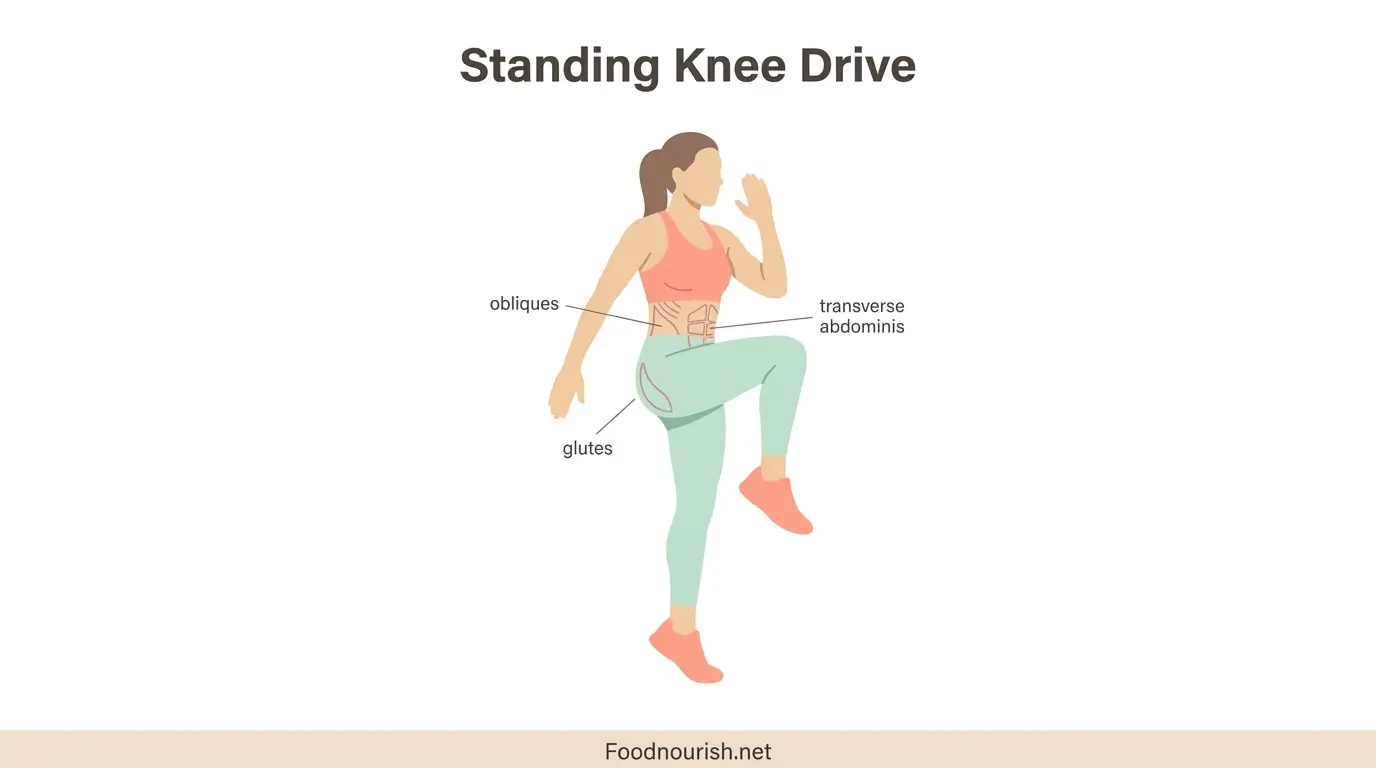
Your transverse abdominis (the deep core muscle that wraps around your midsection), your obliques (the muscles along your sides), your erector spinae (the muscles flanking your spine), your hip flexors, and your glutes ALL activate simultaneously to keep you upright and balanced.
Rebecca Kennedy, a Peloton instructor, explains it this way.
“Any time you transition movements to different planes of motion, you recruit more muscle groups and open up to new variables like stability, balance, posture, and weight transfer” [1].
A standing crunch, for example, engages your legs in a half squat, your postural muscles, and your deep core, while a supine (face-up) crunch focuses primarily on the rectus abdominis.
This full-body engagement translates directly to everyday movements. Carrying groceries, picking up a child, climbing stairs, turning to reach something behind you. Your core powers every one of these actions from a standing position, so it makes sense to train it that way.
For women specifically, standing abs offer three additional advantages.
- Reduced joint strain. Jacque Crockford, a personal trainer certified by the American Council on Exercise, notes that “standing abs are ideal if you experience joint issues, such as neck, lower-back, and wrist pain, while doing floor exercises” [2].
- Pelvic floor engagement. Standing core work activates your pelvic floor muscles (the base of your core that supports your bladder, uterus, and bowel) without the downward pressure that some floor exercises create. This makes standing abs a safer option for women with pelvic floor concerns.
- Higher calorie burn. A standing ab workout burns approximately 6 to 8 calories per minute, compared to 3 to 5 calories per minute for floor-based ab work [3]. The difference comes from supporting your full body weight and engaging more muscle groups at once.
Calorie Burn Per Minute: Standing vs. Floor Abs
A 2023 study in the Journal of Manipulative & Physiological Therapeutics found that 10 weeks of core stability exercises focusing on the pelvic floor and deep abdominal muscles reduced lumbar and pelvic girdle pain in pregnant women and improved their quality of life [4].
Standing core exercises align with this approach because they target the same deep stabilizing muscles.
Your core is a 360-degree system, though, and understanding which muscles you’re training helps you get more from every rep.
Muscles Targeted in a Standing Abs Workout
Your core is a network of muscles that wraps completely around your torso. It is not a single muscle, and training it requires movement in multiple directions.
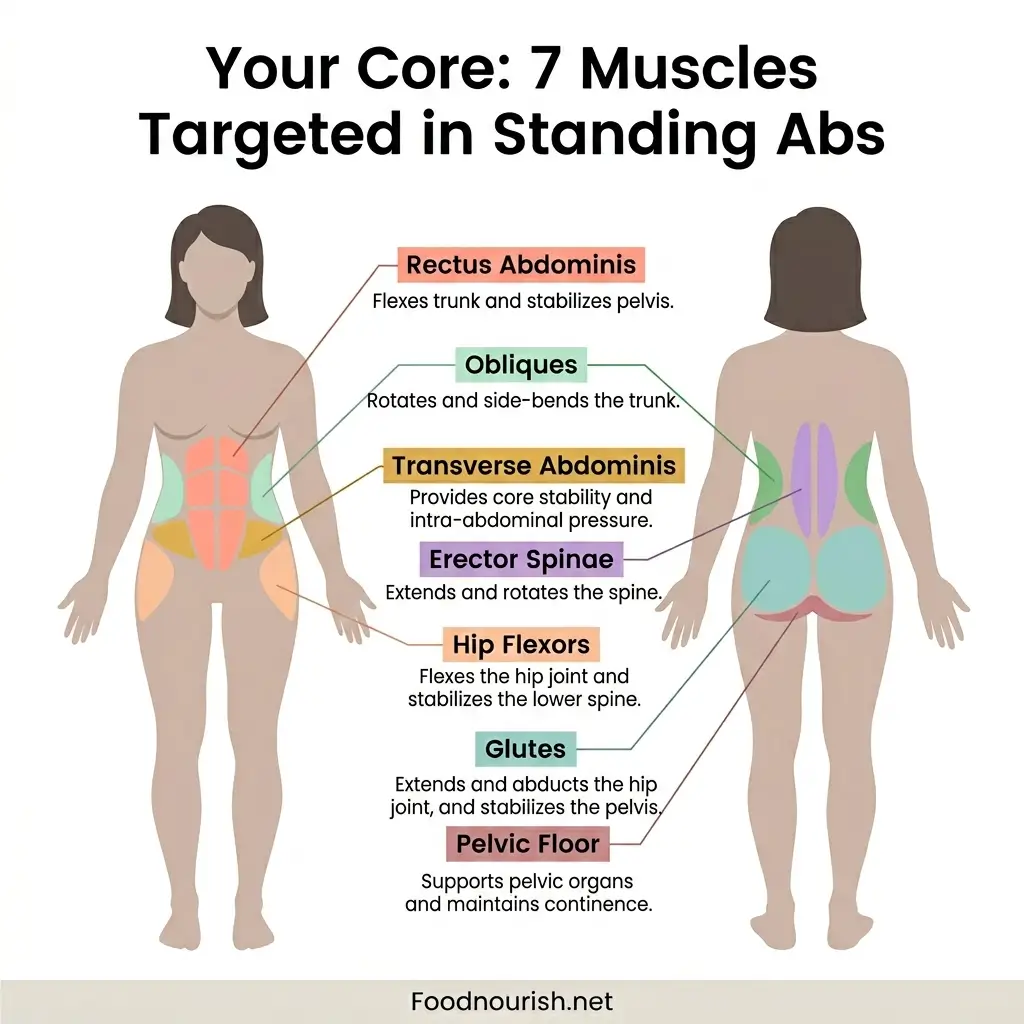
- Rectus abdominis runs vertically down the front of your abdomen. It bends your torso forward and stabilizes your pelvis. This is the muscle people refer to when they say “abs.”
- External and internal obliques sit on each side of your torso. They rotate your trunk, bend you sideways, and resist unwanted rotation during single-arm or single-leg movements. Standing exercises like wood chops and bicycle crunches target them directly.
- Transverse abdominis is the deepest abdominal muscle. It wraps horizontally around your midsection and functions like a built-in weight belt. It compresses your abdominal contents and stabilizes your spine during every standing movement.
- Erector spinae runs along both sides of your spine from your pelvis to the base of your skull. These muscles maintain your posture and protect your lower back. Standing exercises engage them constantly because you must hold your spine upright against gravity. This is one of the key reasons standing abs support posture improvement over time.
- Hip flexors sit at the front of your hip joint. They drive your knee upward during marches, knee drives, and bicycle crunches. Weak hip flexors contribute to lower back pain, so strengthening them through standing core work has a direct payoff.
- Glutes (gluteus maximus and medius) stabilize your pelvis during single-leg exercises and rotational movements. Every time you balance on one foot during a standing ab exercise, your glutes fire to keep your hips level.
- Pelvic floor forms the base of your core. It supports your internal organs and works in coordination with your transverse abdominis during breath-coordinated exercises. Standing core training engages it naturally without the excessive downward pressure some floor exercises create.
Now that you know what you’re training, here are the 15 exercises that build functional core strength from every angle.
15 Standing Ab Exercises for Women (Step-by-Step)
Do these exercises with bodyweight only, or add a light dumbbell (5 to 10 pounds) where noted. Each exercise includes the primary muscles worked, clear instructions, and a form tip.
1. Standing Bicycle Crunch
Targets the rectus abdominis, obliques, and hip flexors.
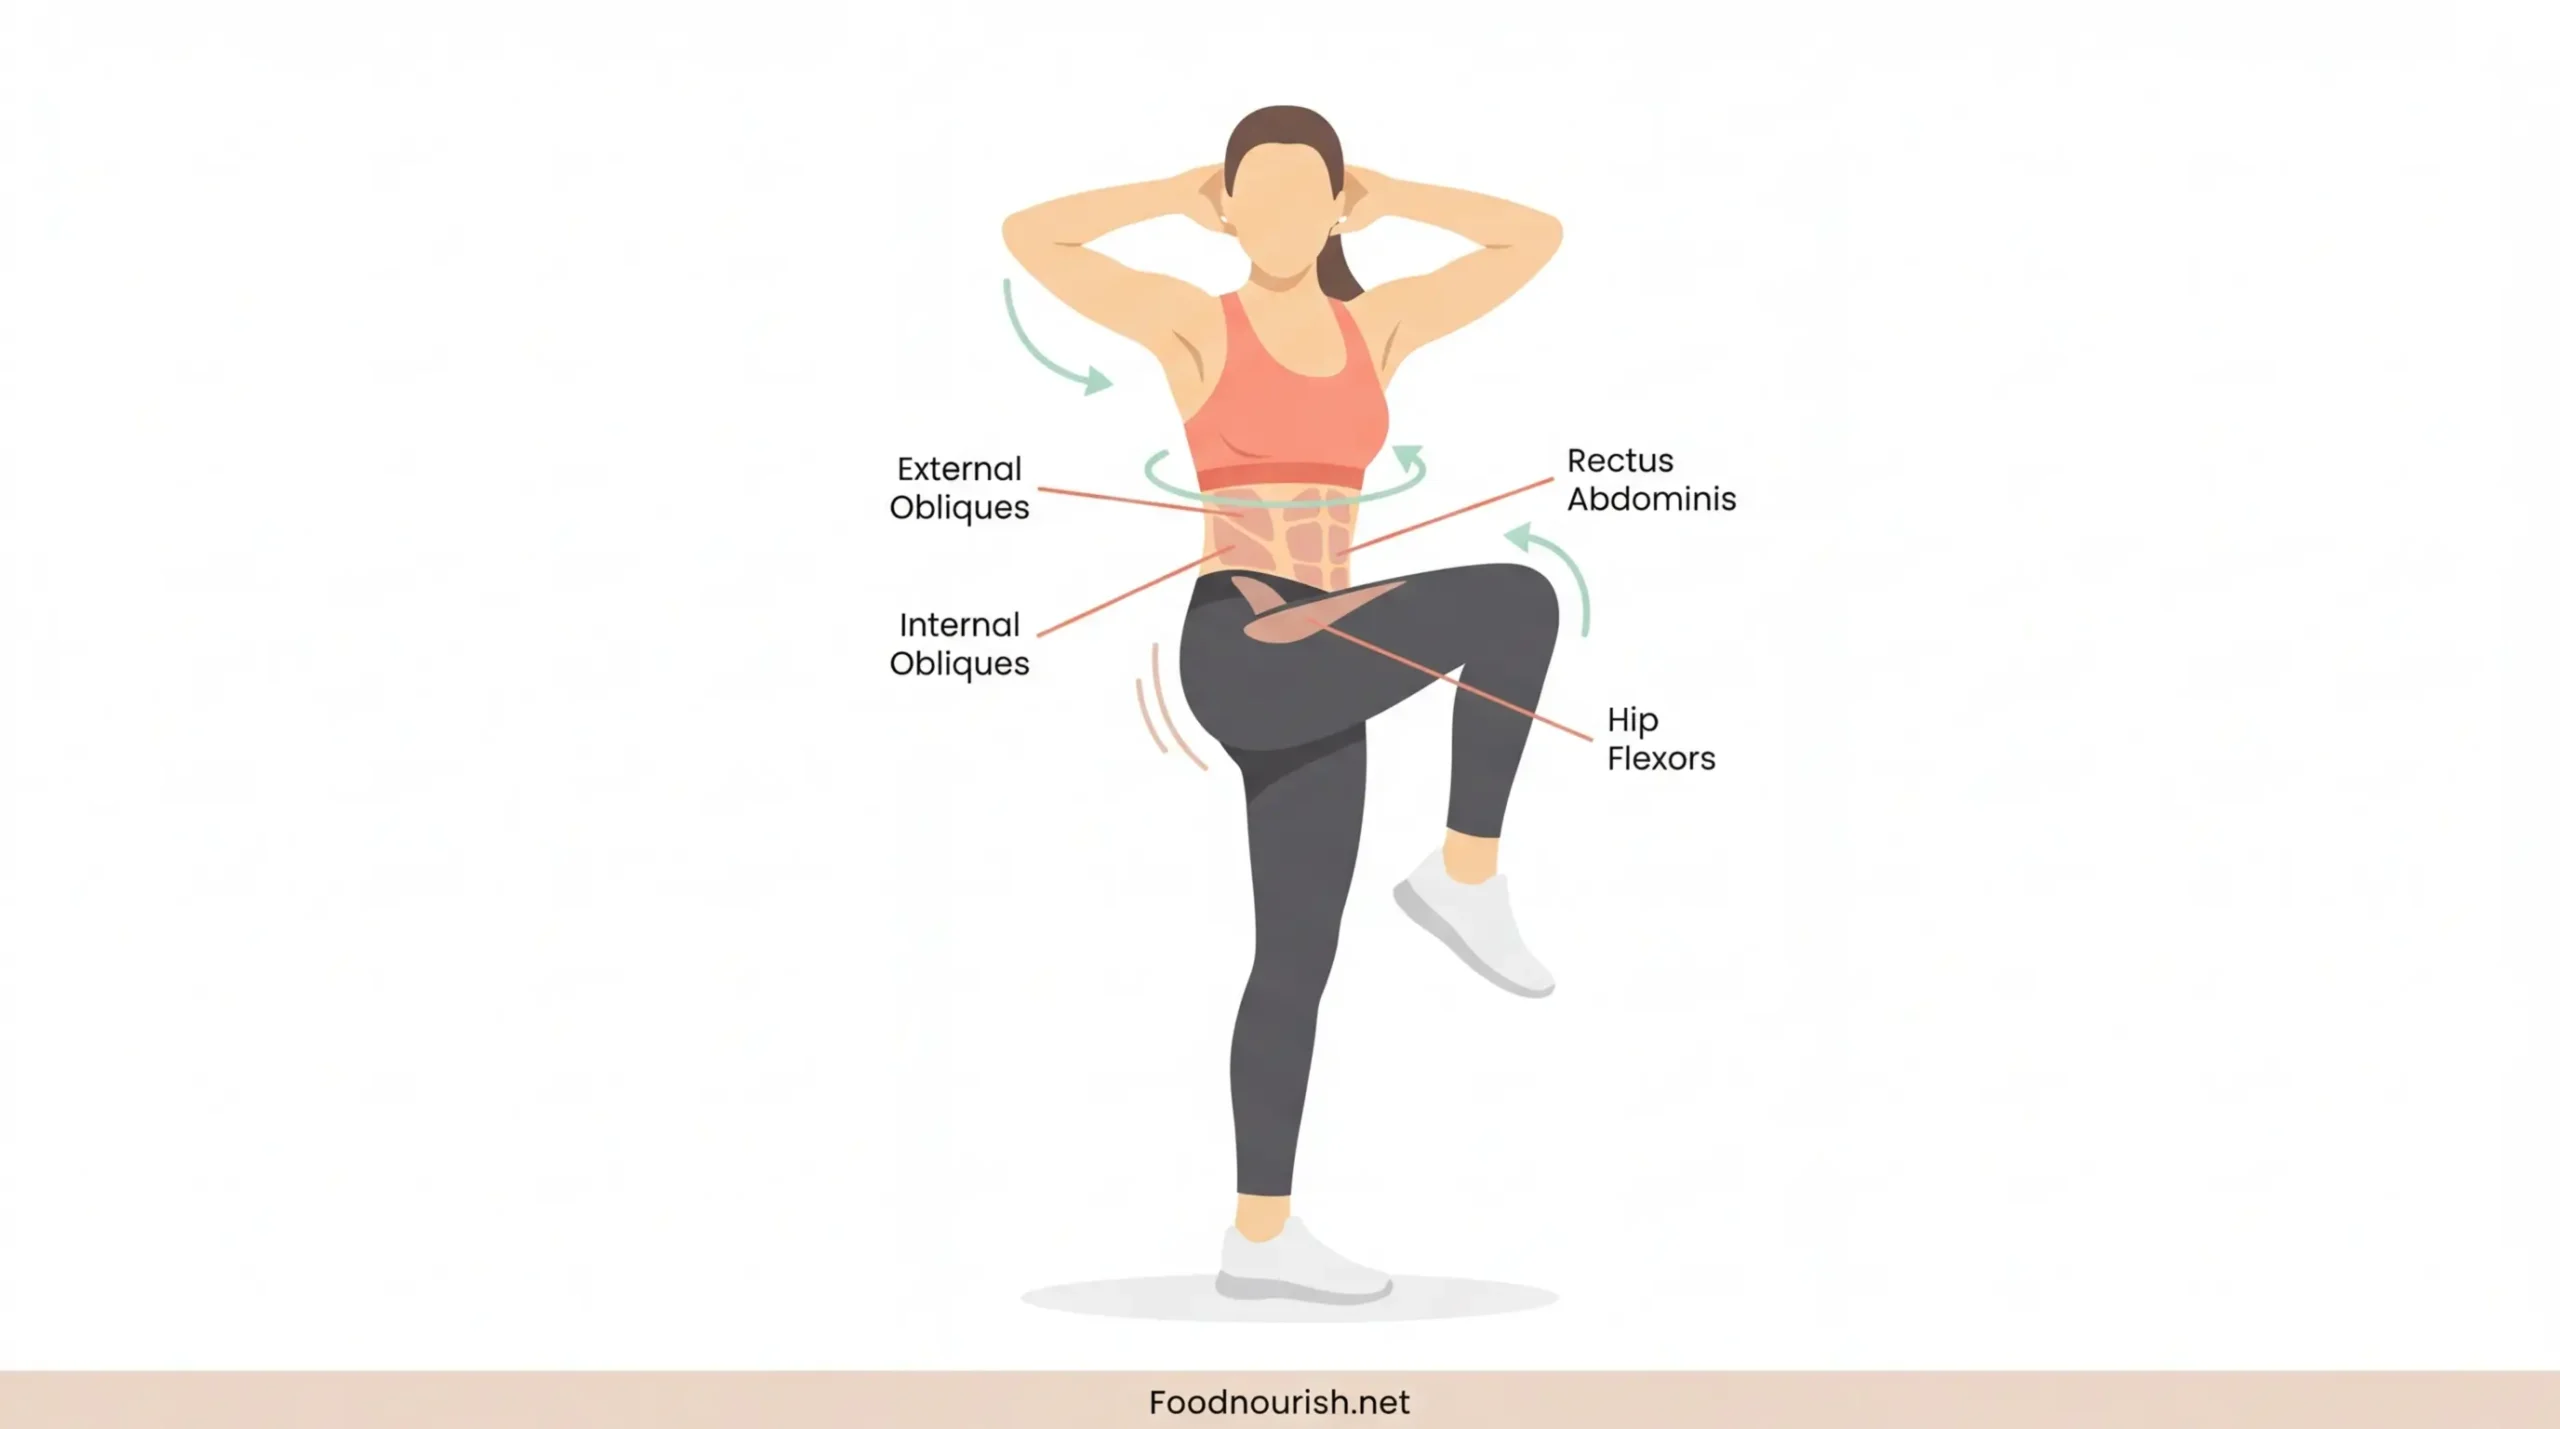
- Stand with your feet hip-width apart. Place your hands behind your head with your elbows wide.
- Lift your left knee toward your chest while rotating your right elbow down to meet it. Squeeze your abs at the point of contact.
- Return to standing and repeat on the opposite side.
- Complete 20 reps total (10 per side), alternating.
Move slowly. The rotation should come from your torso, not your arms pulling on your neck.
2. Wood Chop (Bodyweight or Dumbbell)
Targets the obliques, transverse abdominis, shoulders, and glutes.
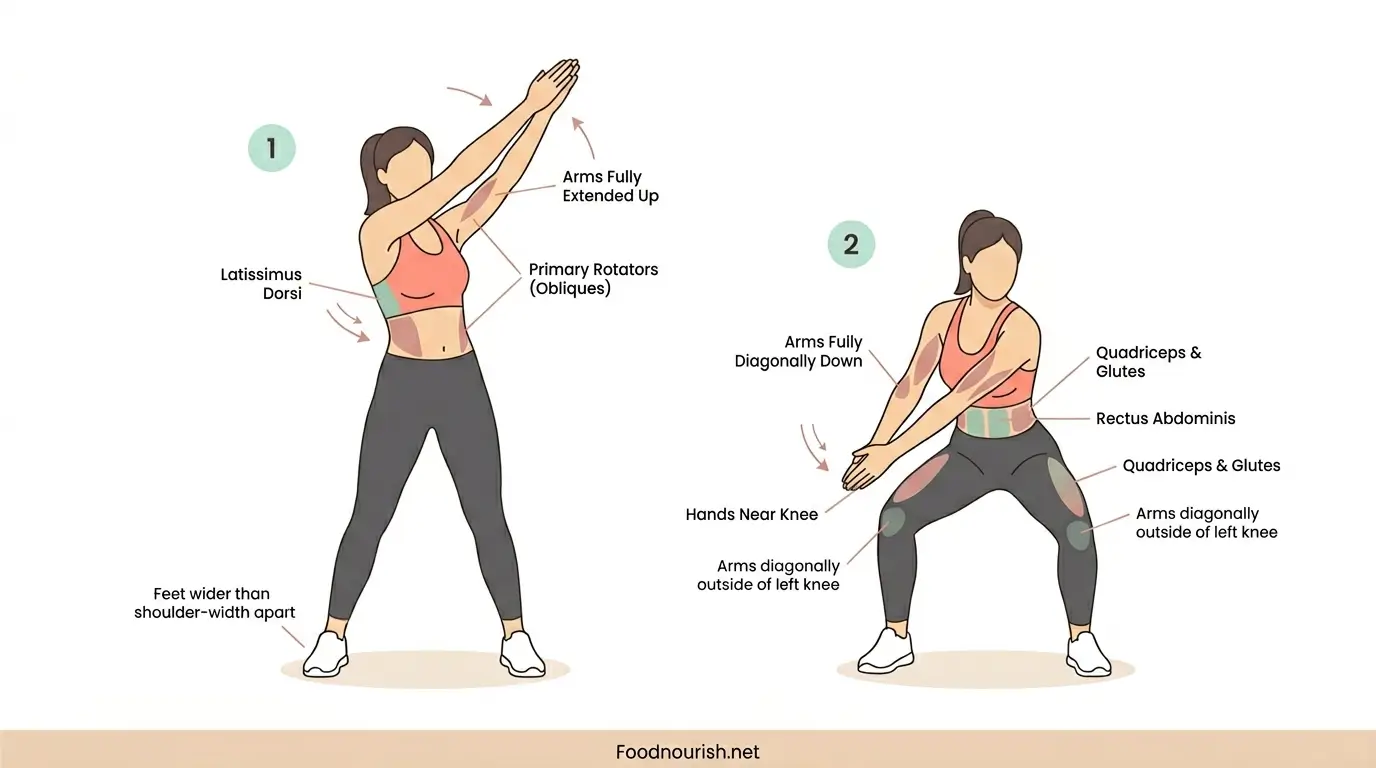
- Stand with your feet slightly wider than shoulder-width. Clasp your hands together (or hold a dumbbell with both hands).
- Extend your arms up and to the right, above your right shoulder.
- Squat slightly while rotating your torso to bring your hands diagonally down toward the outside of your left knee. Let your right foot pivot naturally.
- Reverse the movement to return to the starting position.
- Complete 15 reps per side.
To progress, add a 5-to-10-pound dumbbell. The wood chop exercise is one of the most effective standing core movements because it trains rotation and anti-rotation simultaneously.
3. Standing Side Bend
Targets the obliques, erector spinae, and intercostal muscles (between your ribs).
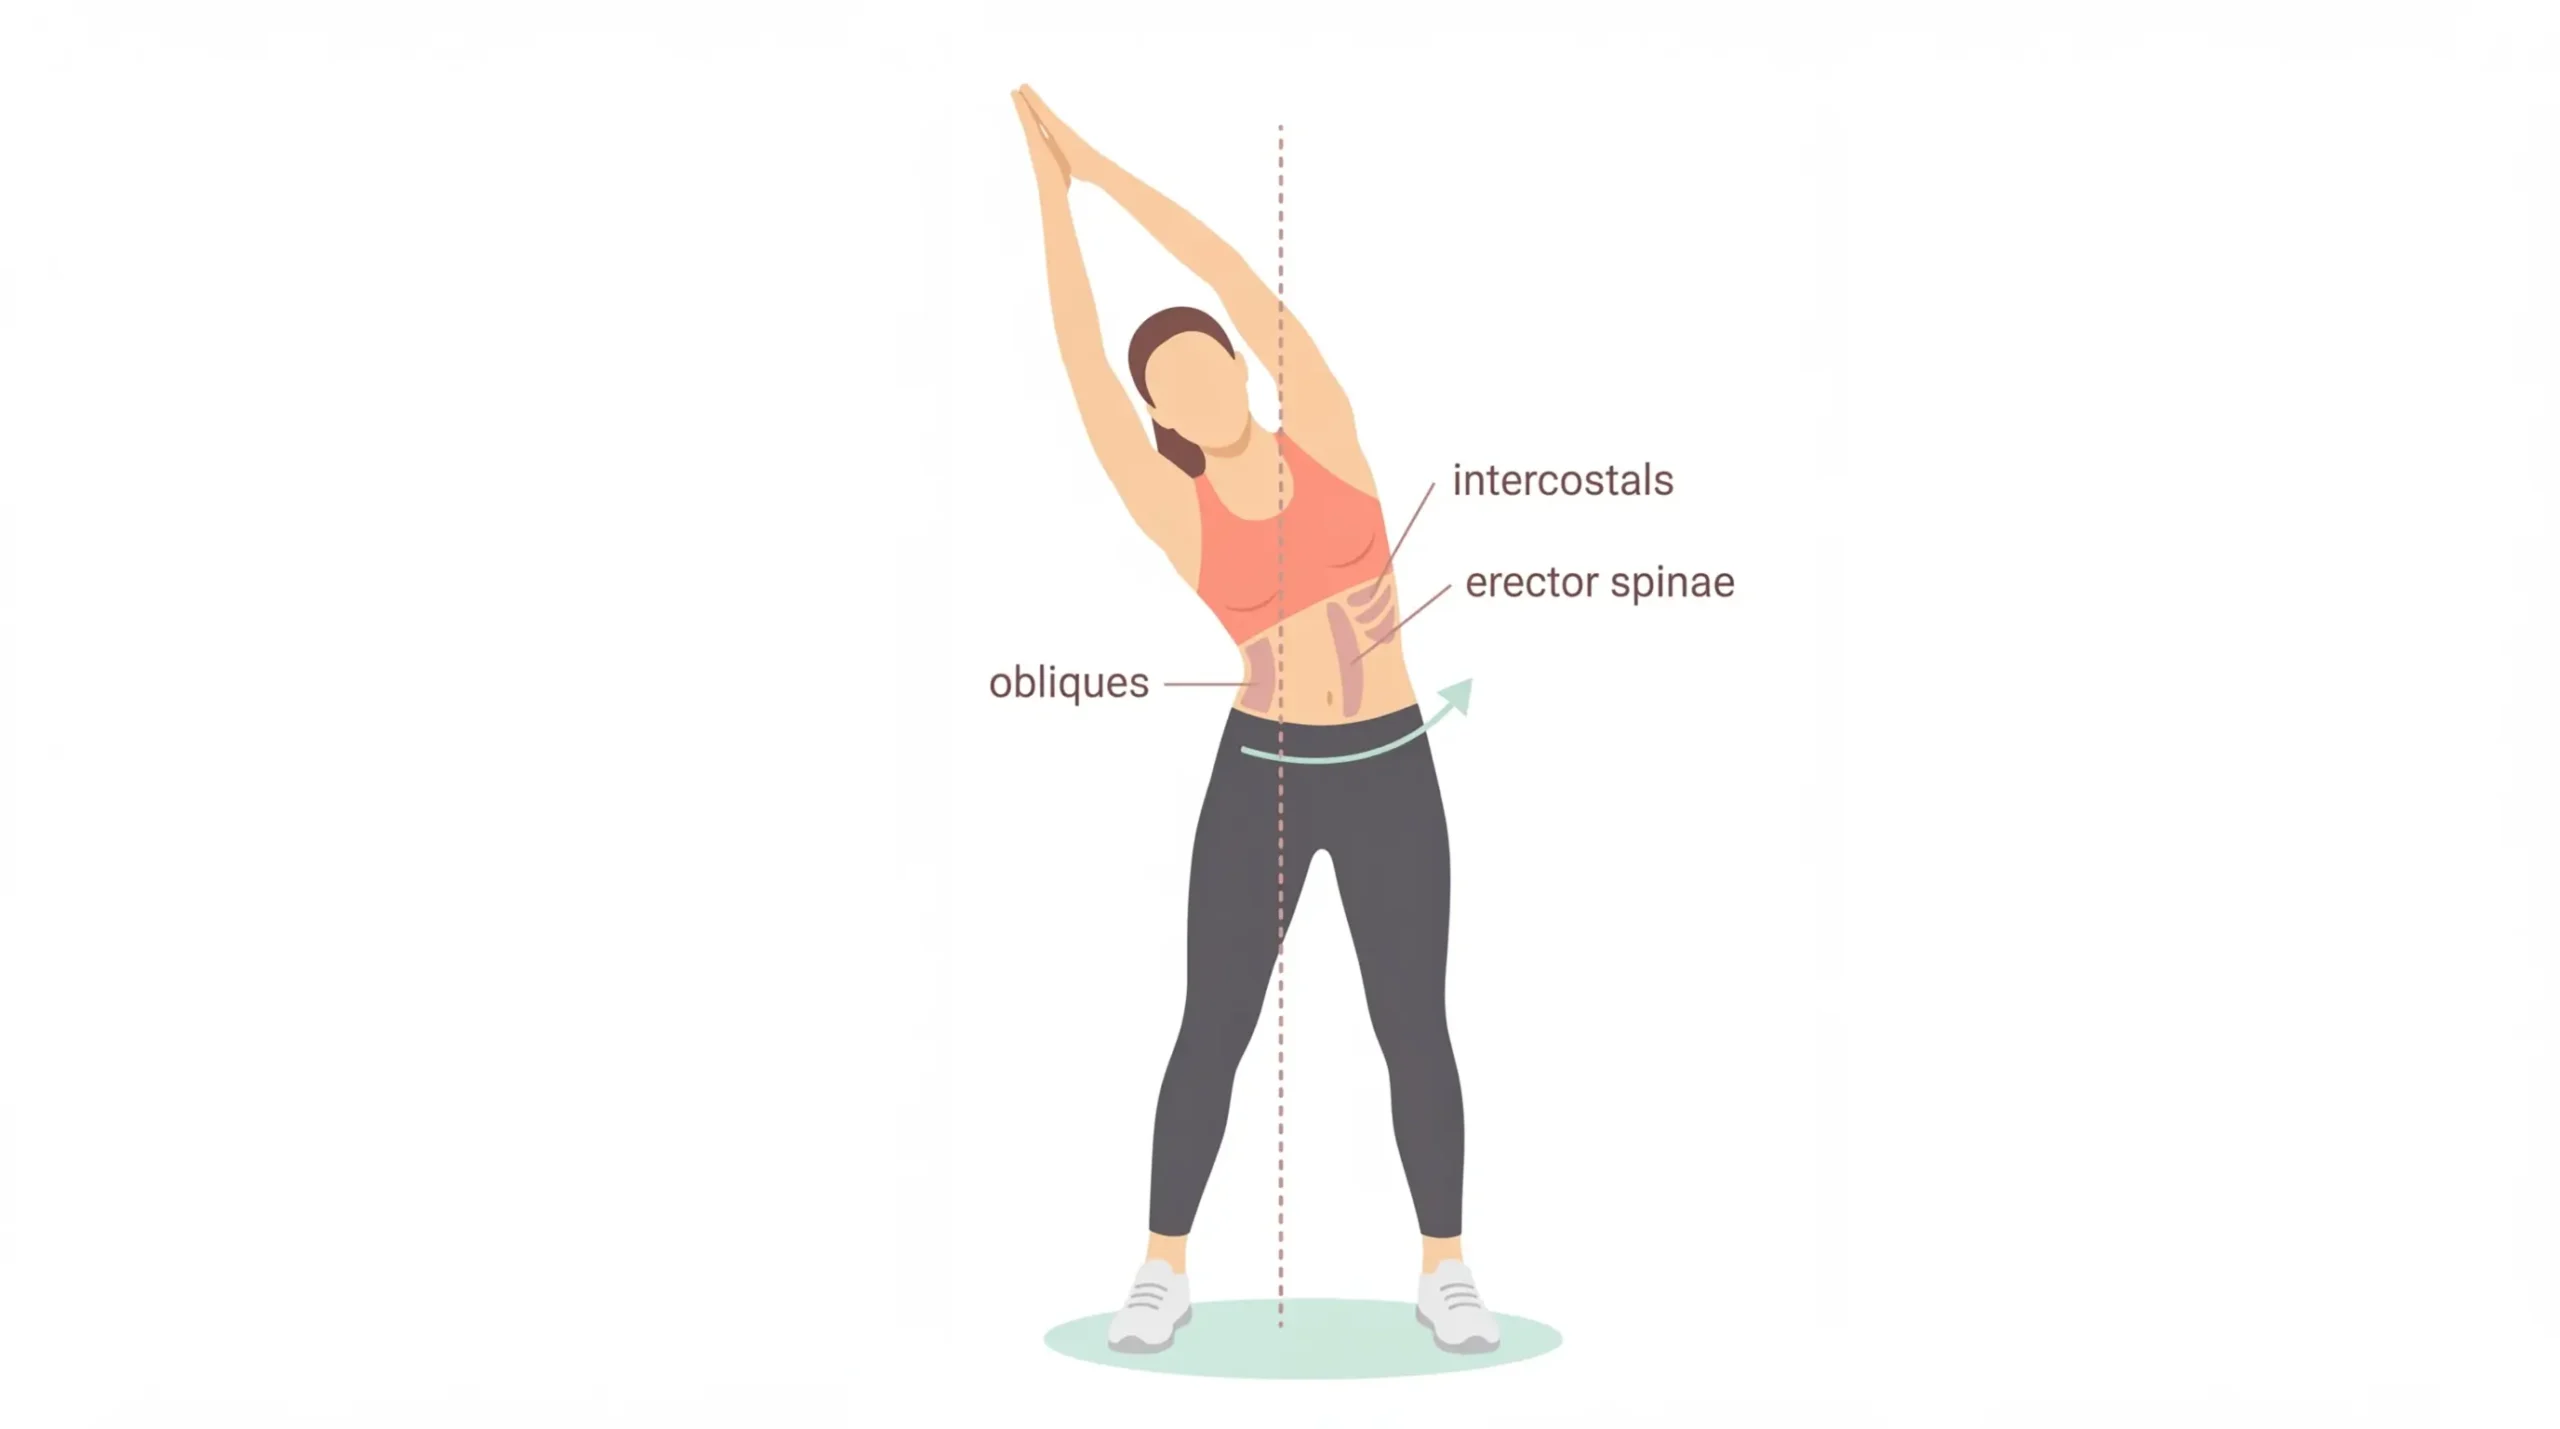
- Stand with your feet hip-width apart. Extend both arms overhead and press your palms together.
- Engage your core and lean slowly to the right, feeling a stretch along your left side.
- Use your obliques to pull yourself back to center.
- Repeat on the left side.
- Complete 15 reps per side.
Keep your hips stationary. Move strictly in a side-to-side plane. If your hips shift, you reduce oblique engagement.
4. High Knee March
Targets the rectus abdominis, hip flexors, and transverse abdominis.
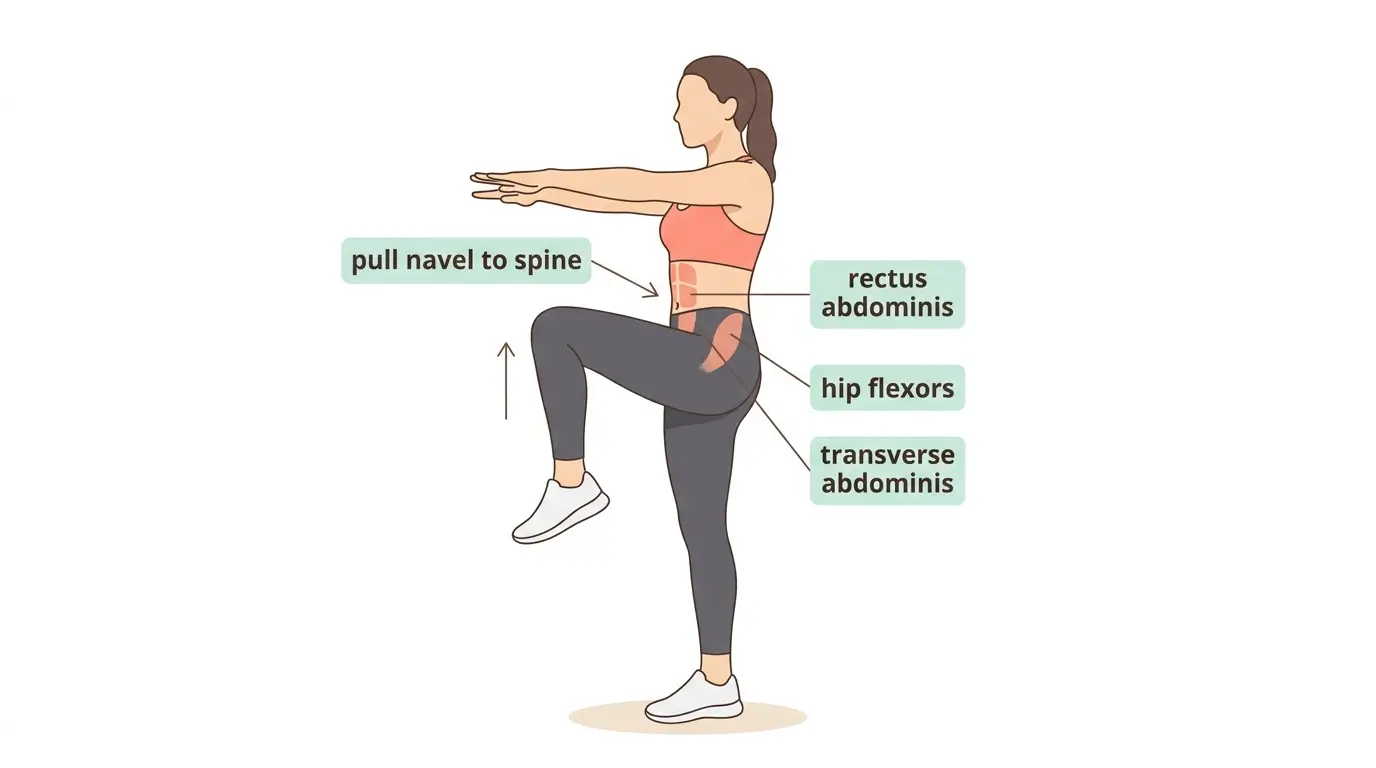
- Stand tall with your arms extended in front of you at chest height, palms facing down.
- Drive your right knee up toward your hands, aiming for hip height.
- Lower with control and immediately drive the left knee up.
- Continue alternating for 30 to 60 seconds.
Pull your navel toward your spine on every knee lift. This cue activates your transverse abdominis and prevents your lower back from arching.
5. Standing Oblique Crunch
Targets the obliques and hip flexors.
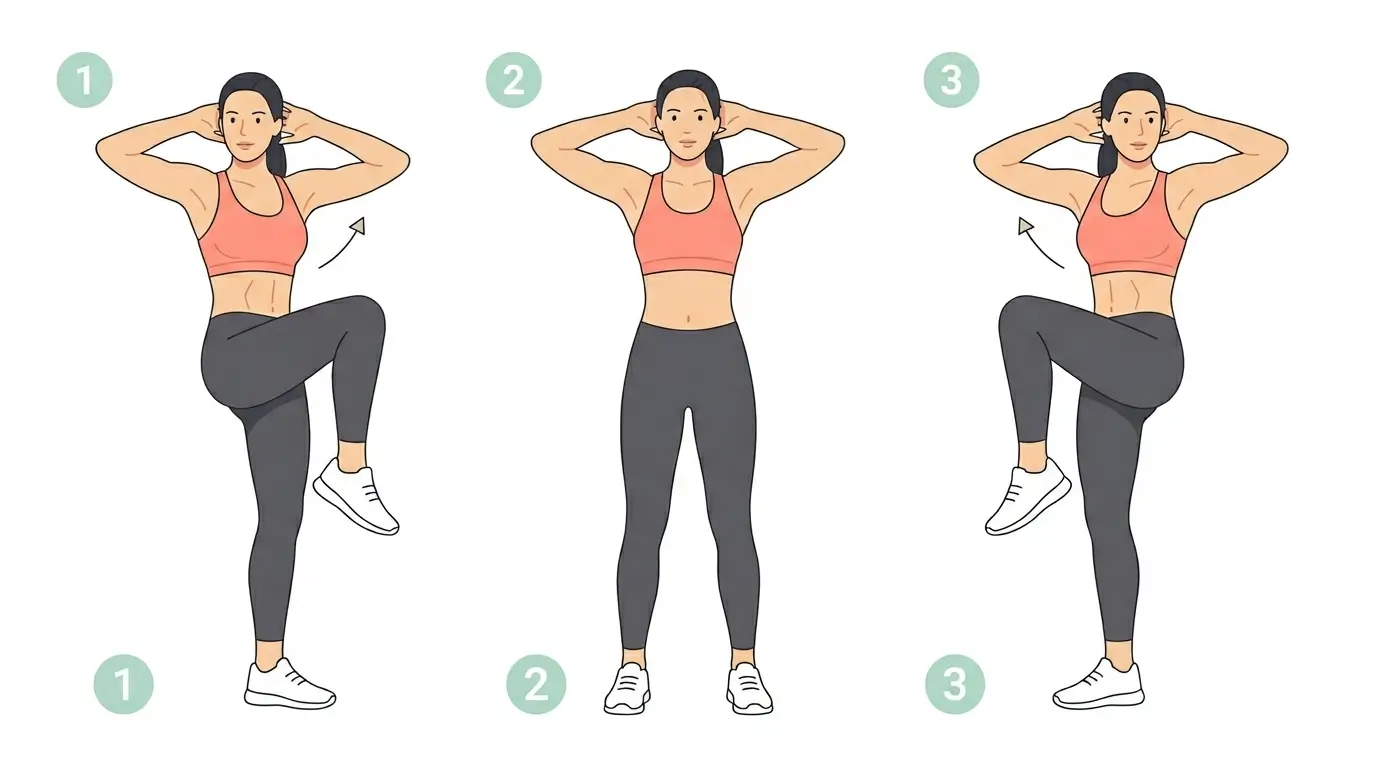
- Stand with your feet shoulder-width apart. Place your hands behind your head, elbows out wide.
- Shift your weight to your left foot. Lift your right knee out to the side while simultaneously crunching your right elbow down toward it.
- Return to standing.
- Complete 15 reps on the right side, then 15 on the left.
Keep your chest tall throughout the movement. Rounding your back shifts the work away from your obliques.
6. Cross-Body Toe Touch
Targets the obliques, hamstrings, glutes, and rectus abdominis.
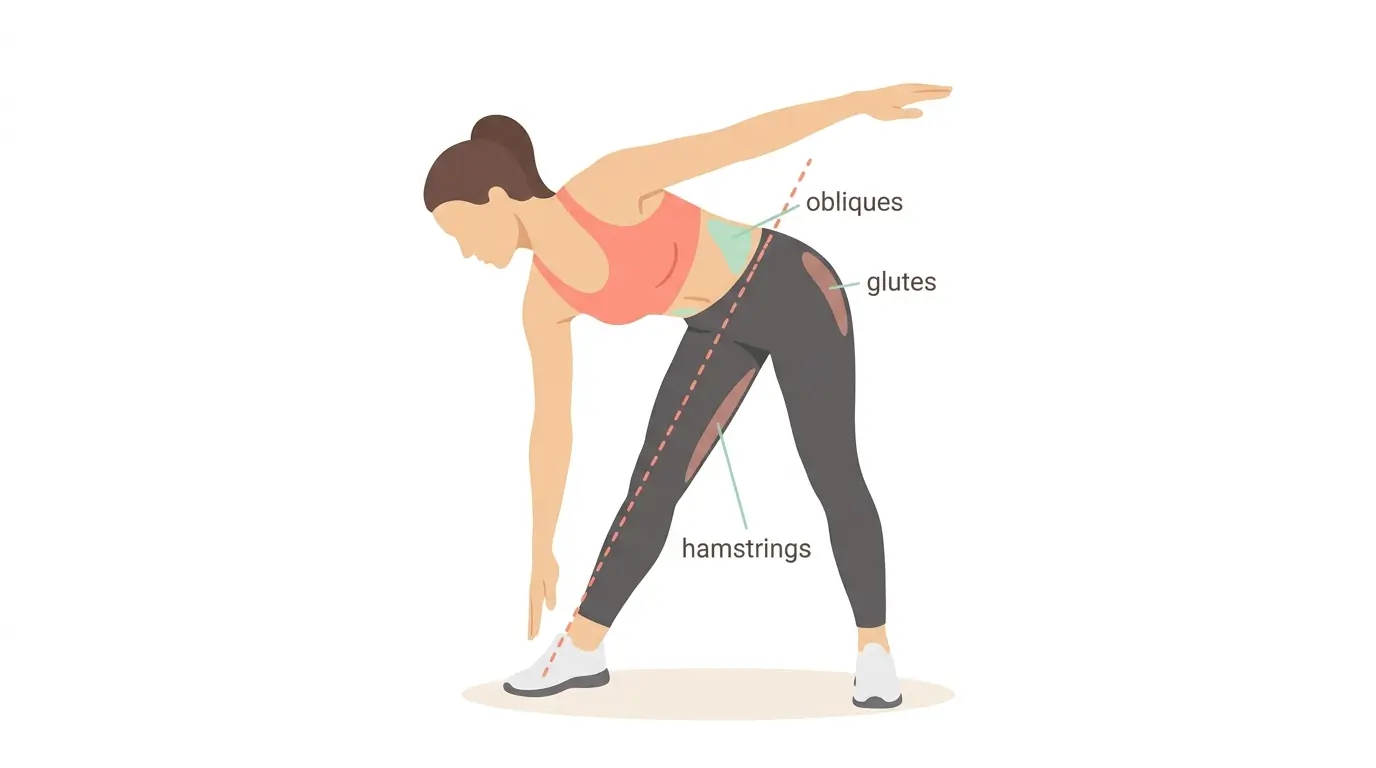
- Stand with your feet slightly wider than shoulder-width, arms extended out to the sides at shoulder height.
- Hinge forward at your waist and reach your left hand toward your right foot. Keep both legs as straight as possible.
- Engage your core to return to standing.
- Repeat on the opposite side.
- Complete 20 reps total (10 per side), alternating.
If your hamstrings are tight, bend your knees slightly. The core activation remains the same.
7. Knee Drive (from Lunge Position)
Targets the rectus abdominis, hip flexors, glutes, and quads.
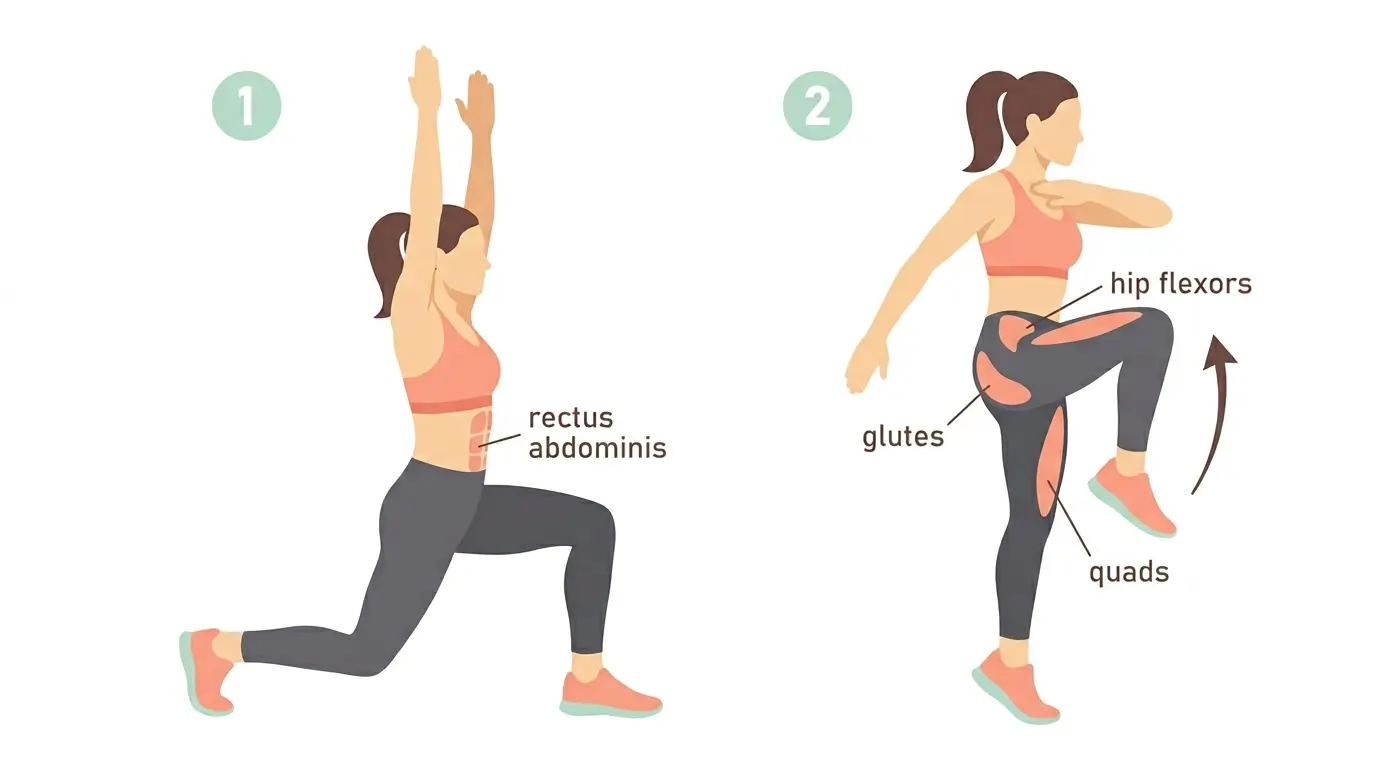
- Step your right foot back into a lunge with your left knee bent at roughly 90 degrees. Extend both arms overhead.
- Drive your right knee forward and up toward your chest while swinging your arms down to frame your knee. Use explosive force from your core.
- Step your right foot back to the lunge position.
- Complete 15 reps on the right side, then switch to the left.
To increase the challenge, hold a dumbbell at chest level. This adds load to your core and shoulders.
8. Standing Cat-Cow
Targets the transverse abdominis, erector spinae, and pelvic floor.
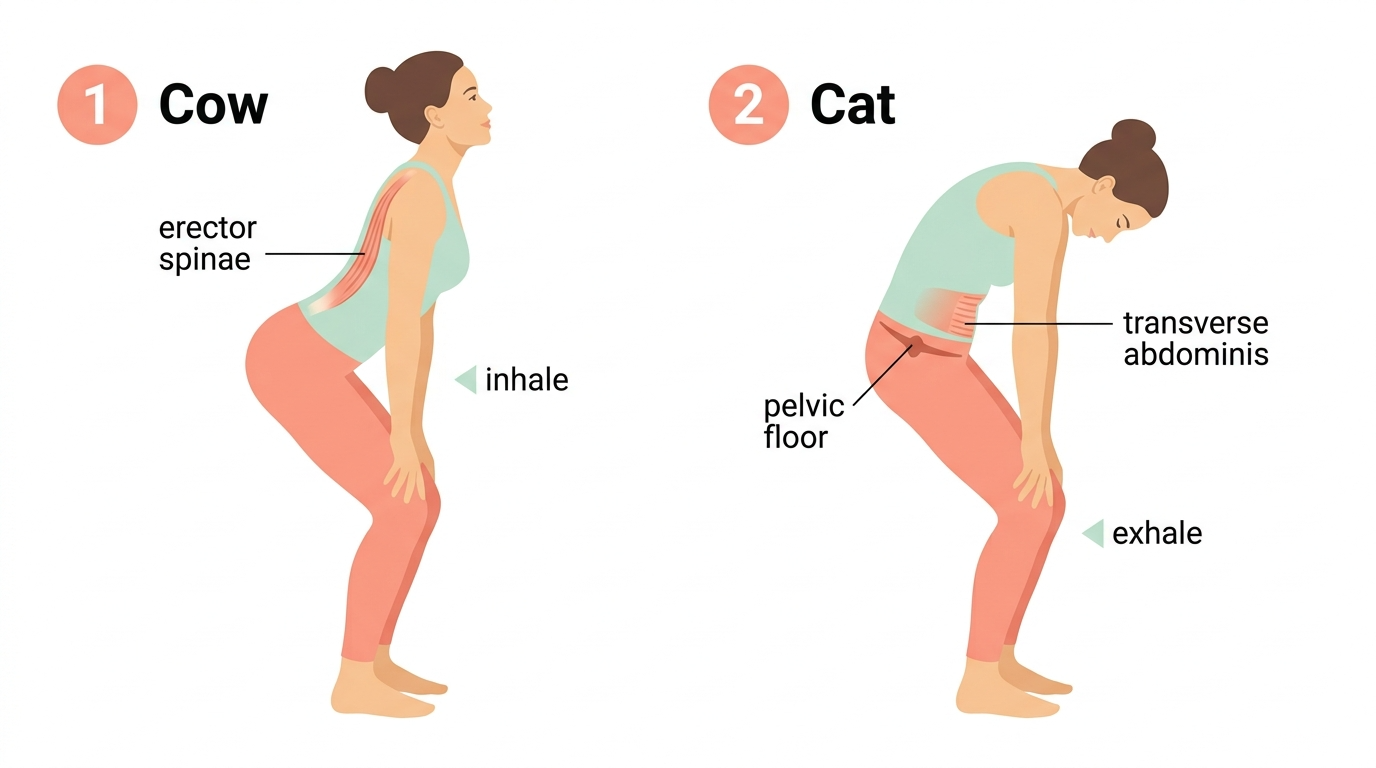
- Stand with your feet hip-width apart. Bend your knees slightly and place your hands on your thighs, just above your knees.
- Inhale and arch your back, lifting your chest and tilting your chin slightly upward.
- Exhale and round your spine, tucking your tailbone and dropping your chin toward your chest. Squeeze your deep core muscles as you round.
- Complete 10 slow, controlled reps.
This is an activation exercise. Use it as a warm-up before your standing abs routine. It teaches you to coordinate your breath with core engagement, which makes every subsequent exercise more effective.
9. Standing Bird Dog
Targets the erector spinae, rectus abdominis, and glutes.

- Stand with your feet together and arms at your sides.
- Simultaneously lift your right arm straight overhead and drive your left knee up to hip height.
- Pause for one second at the top, maintaining balance.
- Lower both and repeat on the opposite side.
- Complete 20 reps total (10 per side), alternating.
Move slowly. The entire challenge of this exercise lives in the controlled pause at the top. Rushing eliminates the core stability benefit.
10. Torso Rotation (Standing Russian Twist)
Targets the obliques and transverse abdominis.

- Stand with your feet shoulder-width apart, knees softly bent. Clasp your hands together at belly button height (or hold a light dumbbell).
- Rotate your shoulders and arms to the right, keeping your hips square to the front.
- Return to center and rotate to the left.
- Complete 20 reps total (10 per side), alternating.
To progress, hold a dumbbell with both hands. The added weight increases the rotational demand on your obliques and transverse abdominis.
11. Standing Dead Bug
Targets the transverse abdominis, hip flexors, and shoulder stabilizers.
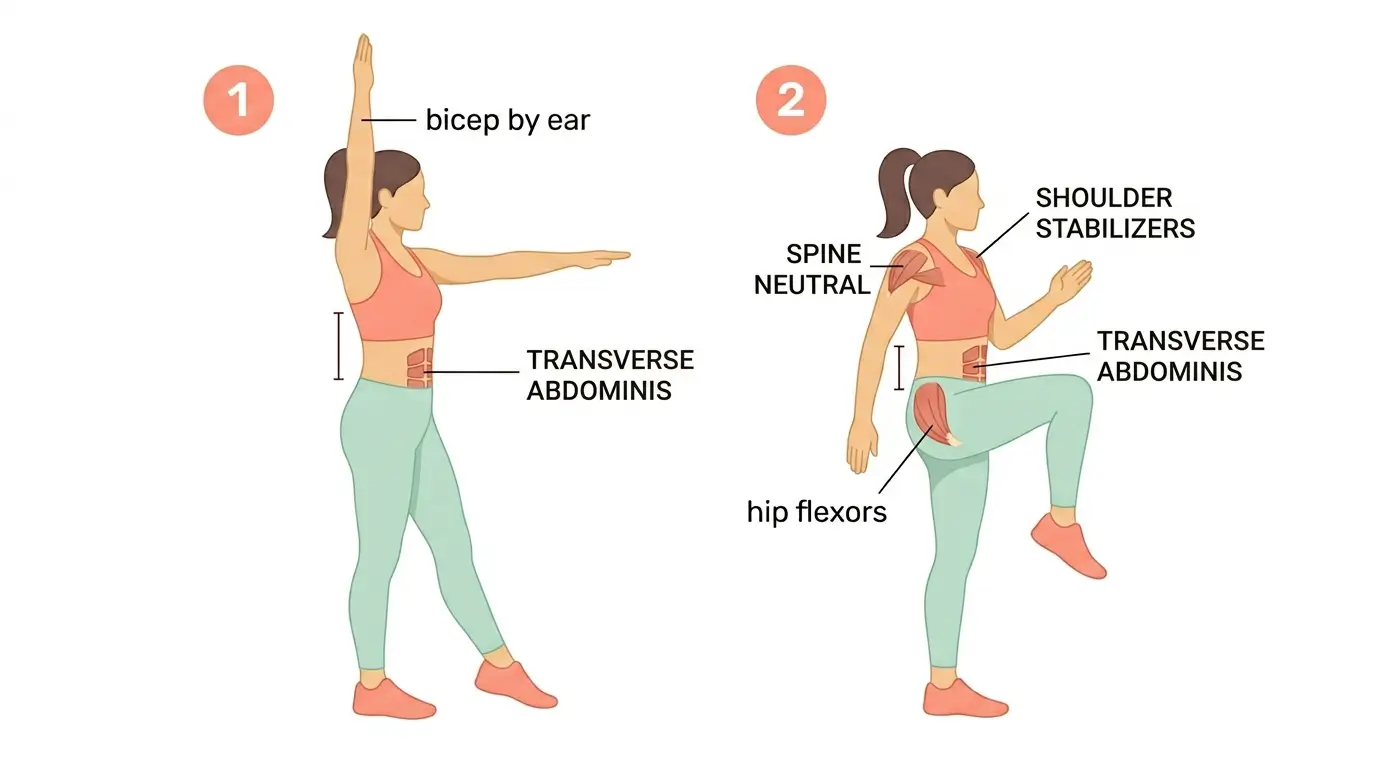
- Stand with your feet together and arms extended forward at shoulder height, palms facing in.
- Extend your right leg forward slightly so only your toes touch the floor. Reach your left arm overhead, bicep by your ear.
- Simultaneously lift your right knee to hip height (bent at 90 degrees) and lower your left arm to chest height.
- Lower your right foot to the floor and reach your left arm back overhead. That is one rep.
- Complete 10 reps per side.
Maintain a neutral spine the entire time. Your back should not arch or round at any point during the movement. If it does, reduce your range of motion.
12. Squat to Twist Press
Targets the obliques, quads, glutes, and shoulders.

- Stand with your feet slightly wider than hip-width. Hold your hands at the center of your chest (or hold a light dumbbell).
- Squat down until your thighs reach parallel.
- Push up quickly, extending your arms overhead while twisting your torso to the right.
- Return to the squat position and repeat, twisting to the left on the next rep.
- Complete 15 reps total, alternating sides.
Squat deep before each twist. The power for the rotation comes from your hips and core, not your arms.
13. Weighted Overhead March
Targets the rectus abdominis, obliques, and shoulder stabilizers.
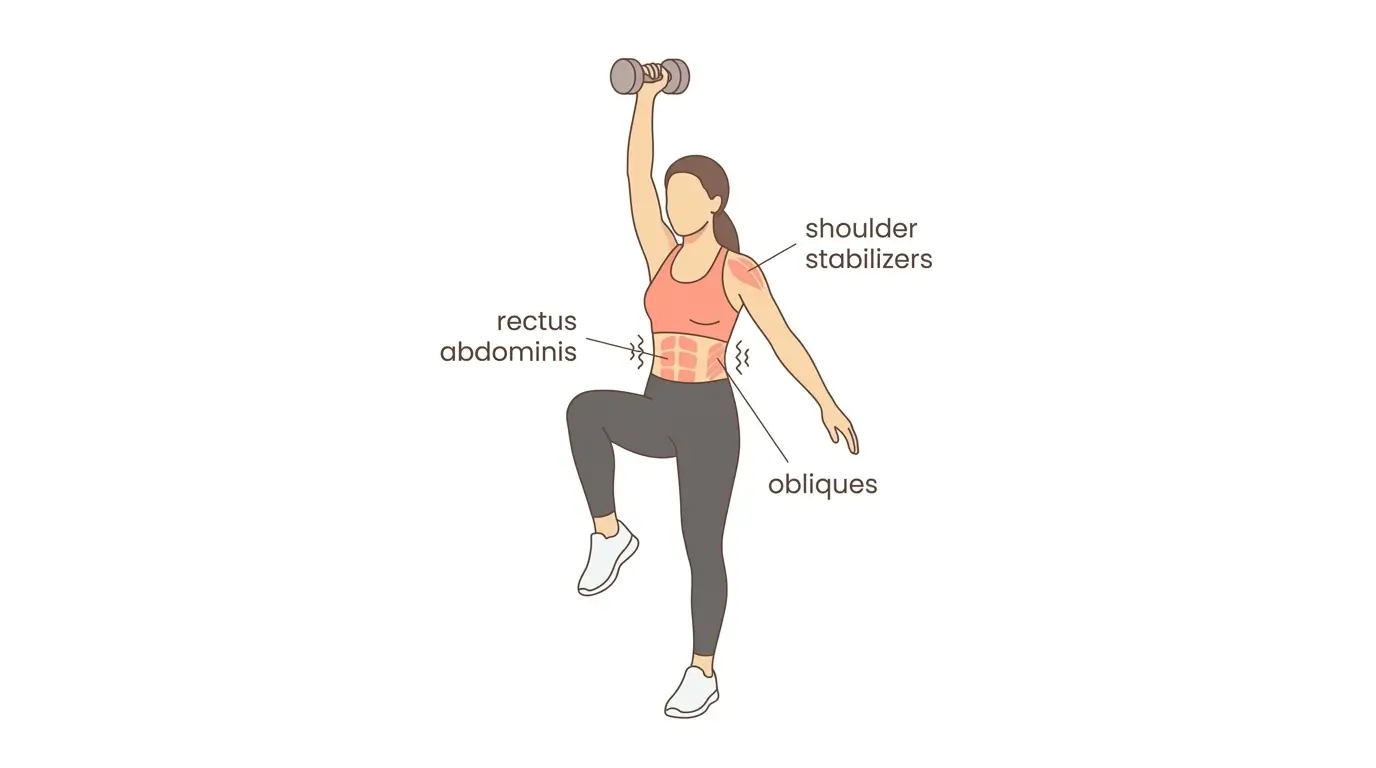
- Stand with your feet hip-width apart. Press a light dumbbell (5 to 10 pounds) overhead in your right hand, bicep close to your ear.
- Engage your core and march in place, driving each knee toward your chest while keeping the dumbbell stable overhead.
- Continue for 30 seconds, then switch the dumbbell to your left hand and repeat for 30 seconds.
The offset load forces your core to work overtime to prevent you from leaning to one side. This is an anti-rotation exercise, meaning your core resists twisting, disguised as a march.
14. Curtsy Lunge to Knee Drive
Targets the inner thighs, obliques, hip flexors, and glutes.
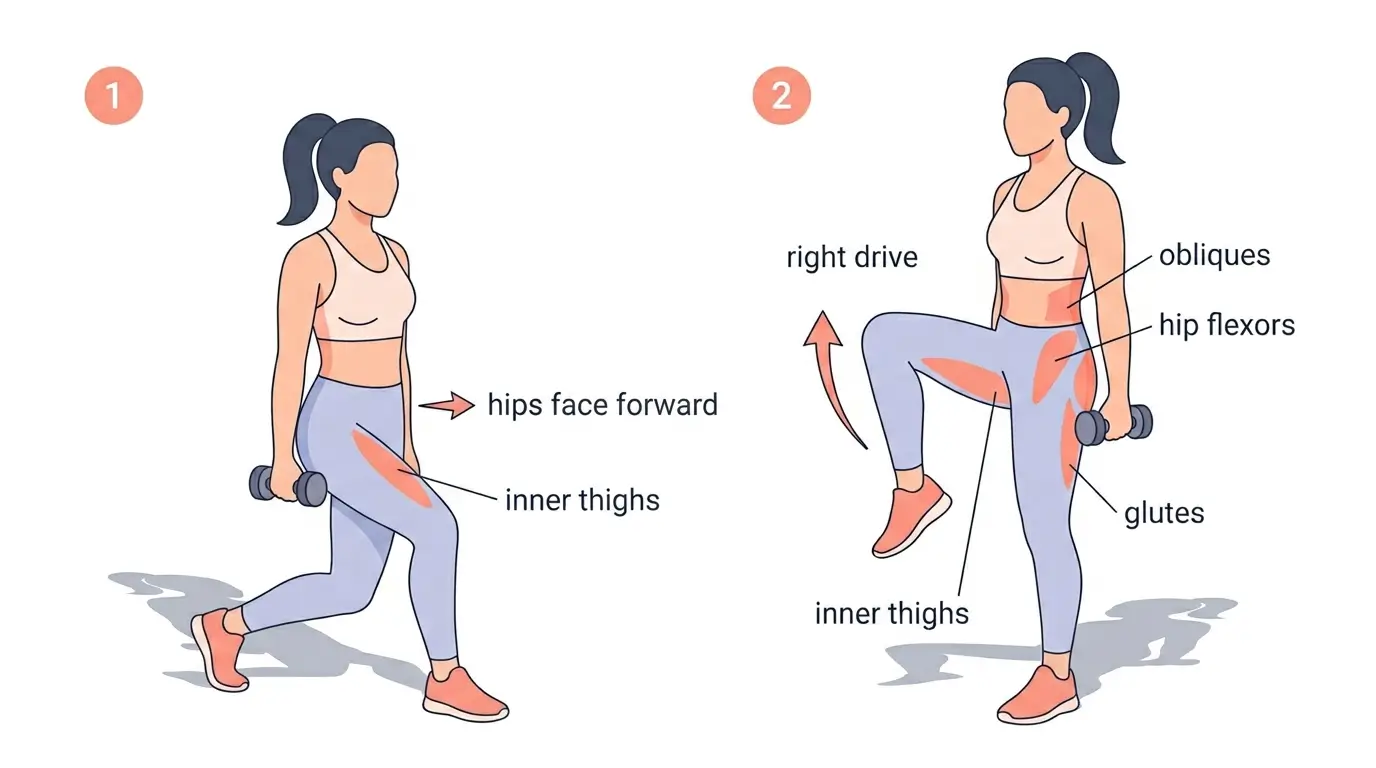
- Stand with your feet hip-width apart. Hold a dumbbell in your left hand at your side (optional).
- Step your right foot back and across to the left diagonal, lowering into a curtsy lunge. Keep your hips facing forward.
- Push through your left foot to stand, and drive your right knee up and out to the side.
- Complete 12 reps on the right side, then switch.
Keep your hips square to the front during the curtsy. If your hips rotate, you lose oblique engagement.
15. Dumbbell Halo
Targets the obliques, transverse abdominis, shoulders, and upper back.
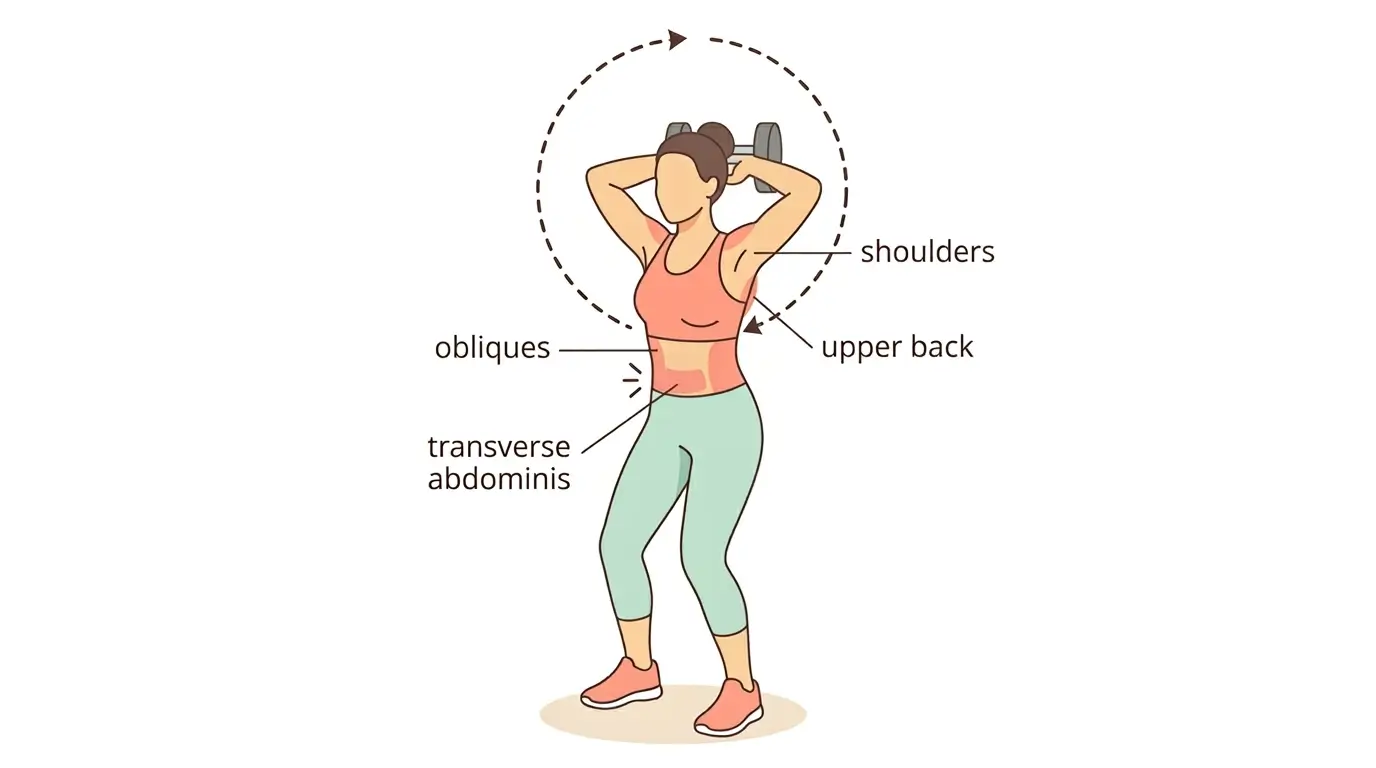
- Stand with your feet shoulder-width apart, knees softly bent. Hold a dumbbell horizontally in both hands in front of your chest.
- Rotate the dumbbell around your head in a controlled circle, moving it from above your left shoulder, behind your head, to above your right shoulder, and back to center.
- Reverse the direction.
- Complete 10 reps in each direction.
Keep your elbows close and your core braced. Do not let your back arch or your ribs flare open as the weight passes behind your head.
You now have 15 exercises that target every part of your core. The next step is putting them into a structured routine you can follow immediately.
3 Ready-Made Standing Abs Routines
Choose the routine that fits your schedule and fitness level. Each one uses exercises from the list above.
How often should you do these routines? Aim for 2 to 4 sessions per week. Your core muscles recover faster than larger muscle groups like your glutes or quads, but rest days still matter. If you feel sore in your abs or lower back, take a day off or focus on a different muscle group.
You might be wondering how standing abs compare to floor exercises. The answer is more nuanced than most workout guides suggest.
Standing Abs vs. Floor Abs: Which One Wins?
Neither. Both have a role, and the best approach depends on your goals and your body.
| Standing Abs | Floor Abs | |
|---|---|---|
| Muscles Engaged | Full core + glutes, hip flexors, legs | Primarily rectus abdominis |
| Calorie Burn | 6-8 cal/min | 3-5 cal/min |
| Joint Strain | Low (no neck, wrist, or back pressure) | Moderate (neck, wrist, lower back) |
| Functional Transfer | High (mimics daily movement) | Moderate (isolation-focused) |
| Equipment Needed | None required | Mat recommended |
| Best For | Joint issues, postpartum, time efficiency | Ab isolation, hypertrophy |
Floor exercises offer more spinal support. The ground beneath you provides feedback about your body position, which helps you isolate specific muscles like the rectus abdominis. Planks and dead bugs performed on the floor are excellent for building raw abdominal endurance, and they can be easier for people with balance issues or vertigo.
Standing exercises recruit more muscles at once, improve functional core strength, and reduce joint strain. They train your core the way you actually use it during daily life, on your feet, resisting rotation, maintaining balance, and transferring power between your upper and lower body.
If you experience neck, back, or wrist pain during floor exercises, standing abs are the better choice for you. If you’re training for maximum abdominal hypertrophy (visible muscle definition), floor work still plays a role because it allows greater isolation of the rectus abdominis.
The practical recommendation is to make standing abs your primary core training method and add floor exercises 1 to 2 times per week if your body tolerates them. This combination gives you functional strength AND targeted muscle development.
“Standing abs are ideal if you experience joint issues, such as neck, lower-back, and wrist pain, while doing floor exercises. They’re great for small spaces, building proprioception (your body’s sense of where it is in space) and balance, and training power,” according to Jacque Crockford, a personal trainer certified by the American Council on Exercise [2].
For women recovering from pregnancy, standing abs offer specific advantages that deserve their own section.
Are Standing Abs Safe for Postpartum and Diastasis Recti?
Standing core exercises can be a safe and effective option for postpartum recovery because they reduce pressure inside your abdomen (intra-abdominal pressure) compared to crunches and sit-ups.
This matters for diastasis recti, a condition where the left and right sides of the rectus abdominis separate along the midline of the abdomen.
Traditional crunches increase pressure against that separation and can make it worse. Standing exercises that focus on deep core activation (transverse abdominis) and breath coordination can help the tissue heal.
Safe standing exercises for diastasis recti from the list above include Standing Cat-Cow, Standing Bird Dog, High Knee March (at a slow tempo), and Torso Rotation (with light or no resistance).
Exercises to approach with caution include aggressive twisting movements, heavy loaded overhead exercises, and any movement that causes visible “doming” or “coning” along your midline. If you see a ridge forming down the center of your abdomen during an exercise, stop and choose a gentler option.
“Standing core can be a great option for women who are pregnant, as the movements can accommodate most trimesters,” notes Peloton instructor Rebecca Kennedy [1].
A 2023 study confirmed that core stability exercises targeting the pelvic floor and deep abdominal muscles reduced pain and improved quality of life in pregnant women with lumbar and pelvic girdle discomfort [4].
One of the most common questions about any workout routine is when results become visible. Most guides dodge this question. Here is a direct answer.
How Long Until You See Results?
With consistent training (2 to 4 sessions per week), most women notice improved core strength and posture within 2 to 3 weeks. You will feel the difference before you see it.
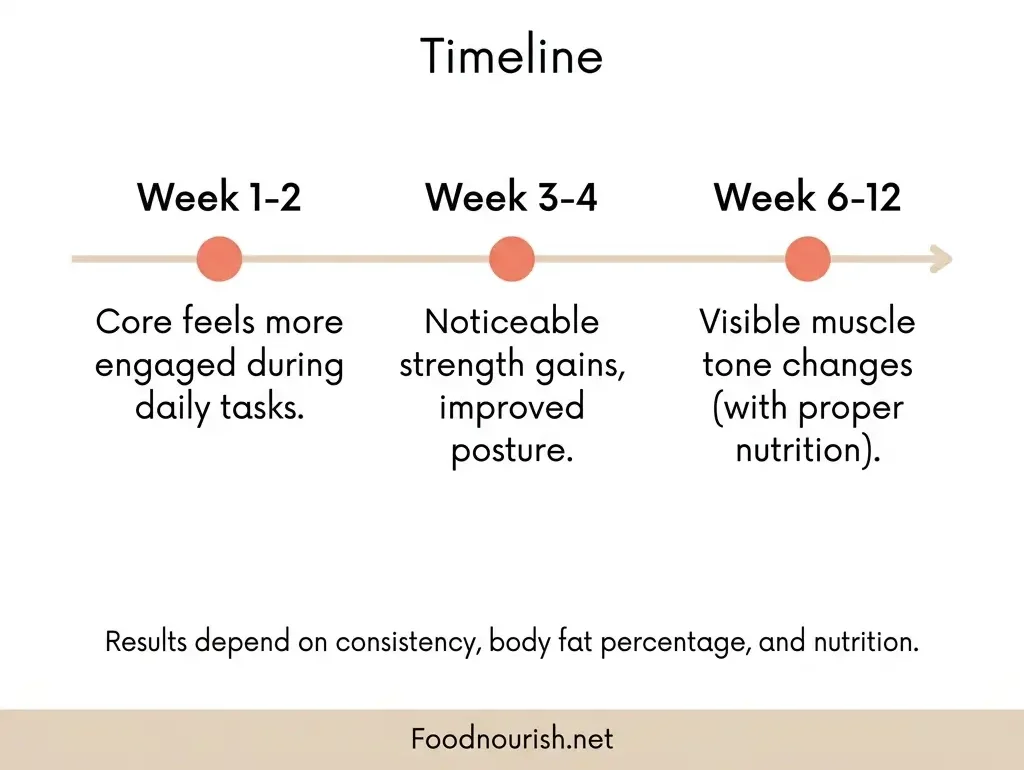
Daily activities like carrying bags, sitting at a desk, and climbing stairs will feel easier because your deep stabilizers are working more efficiently.
Visible changes in muscle tone typically take 6 to 12 weeks and depend heavily on your body fat percentage and nutrition.
Standing abs alone will not “burn belly fat” from a specific area. A 2011 study in the Journal of Strength and Conditioning Research found that six weeks of abdominal exercises alone produced no measurable change in abdominal fat [5]. Spot reduction is a myth.
“How do I get visible abs, then?” You pair your standing abs routine with a calorie-appropriate diet and regular full-body strength training or cardio.
The exercises in this guide build the muscle. Nutrition and overall activity level determine whether that muscle becomes visible.
Track your progress by how your core FEELS during daily tasks, not by how it looks in the mirror, especially during the first four weeks. Strength gains come faster than visual changes, and they matter more for long-term health.
The right exercises performed with poor form won’t produce results either. Avoid these five common mistakes.
5 Common Mistakes to Avoid During Standing Ab Exercises
- Rushing through reps. Standing ab exercises depend on controlled, deliberate movement. Speed reduces core engagement and shifts the work to momentum. If you can’t feel your abs working, slow down by 50%.
- Holding your breath. Exhale during the effort phase (the crunch, twist, or lift). Inhale during the reset. Coordinated breathing increases core activation significantly because the exhale helps your transverse abdominis contract. Rebecca Kennedy recommends “thinking about blowing out as many birthday candles as possible” during the exertion [1].
- Arching your lower back. Before each rep, tuck your pelvis slightly and brace your core. If your lower back arches during knee drives or overhead movements, you’re compensating with your hip flexors instead of your abs. Reduce the range of motion until you can maintain a neutral spine.
- Using momentum instead of muscles. Swinging your arms or legs to complete a movement is a sign the exercise is too advanced for your current strength level. Reduce the range of motion, drop any weight you’re holding, or slow the tempo. The goal is controlled tension, not completion.
- Skipping the warm-up. Spend 2 minutes on dynamic preparation before your workout. Hip circles, side reaches, and Standing Cat-Cow (exercise 8 in this guide) are ideal. Cold muscles are more prone to strain, and a brief warm-up primes your nervous system for better core activation.
Frequently Asked Questions
Pick one of the three routines above and try it today. Save this guide for your next session. Your core does not need a mat to get stronger. It needs consistency and the right exercises. You now have both.

Sources
- [1] Peloton Blog, “Tired of Crunches? Try These 15 Standing Core Exercises”, 2025.
- [2] Experience Life / Lifetime, “Standing Abs Vs. Floor Abs, Which Is Better?”, February 2024.
- [3] Fitness Blender, “Standing Abdominal Workout, 34 Minute Cardio & Core”, calorie estimate based on 130 lb female.
- [4] Kokanalı D, et al. “The effect of core stability exercises on pregnancy-related low back and pelvic girdle pain.” Journal of Manipulative & Physiological Therapeutics. 2023;46(3):198-205. PubMed.
- [5] Vispute SS, et al. “The effect of abdominal exercise on abdominal fat.” Journal of Strength and Conditioning Research. 2011;25(9):2559-2564. PubMed.
- [6] Harvard Health Publishing, “Core Conditioning, It’s Not Just About Abs”, Harvard Medical School.
You can share and adapt this content for non-commercial purposes, provided you give appropriate credit.