
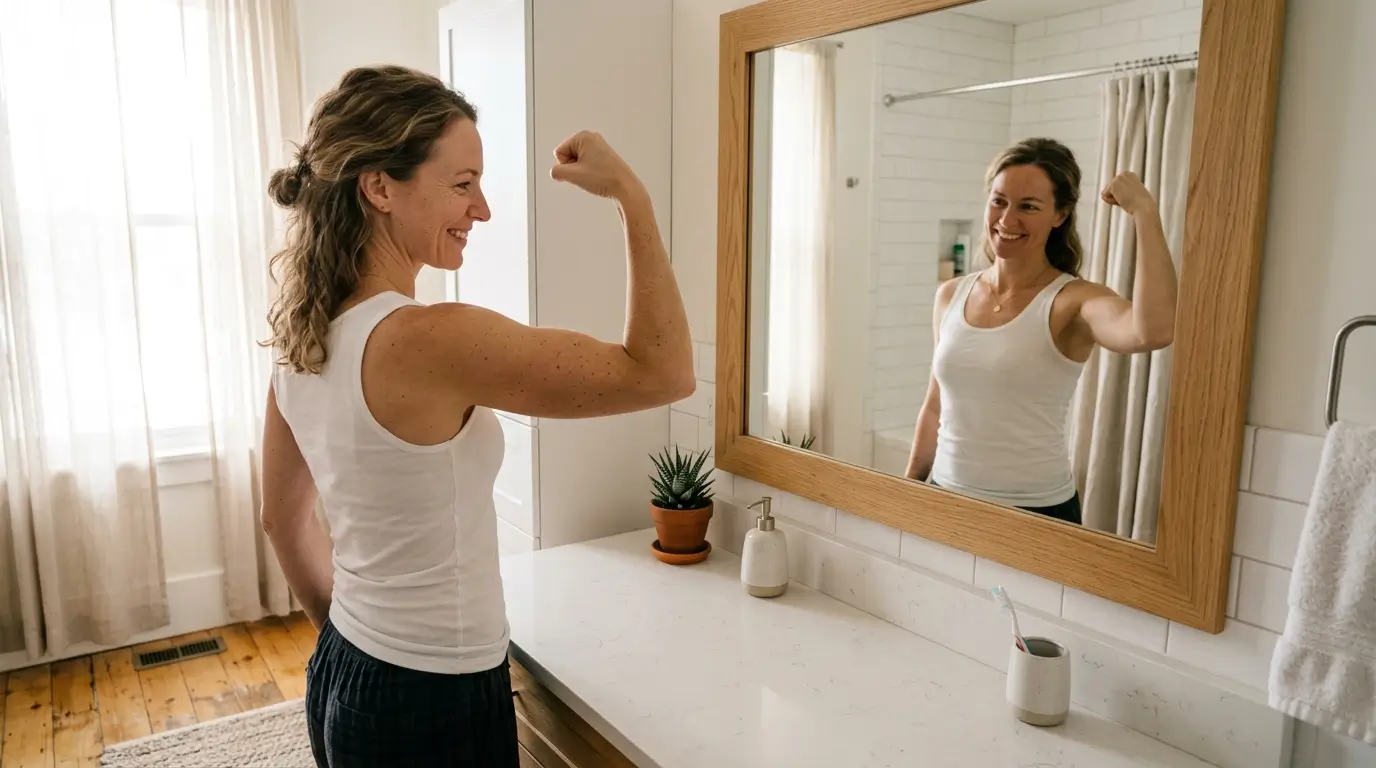
The Best Arm Fat Workouts at Home for Women (No Gym Needed)
Tone your arms in 4 weeks with exercises that work for your body, not against it.
You have tried the random YouTube workouts. You have done the 100 arm circles before bed. And you still avoid sleeveless tops because your upper arms carry weight that will not budge.
Arm fat, often called “batwing arms,” is one of the most common body image frustrations women deal with.
This article gives you two things.
- First, a science-backed explanation of why your body stores fat in your arms.
- Second, a complete 4-week arm fat workouts plan you can follow at home with zero gym and minimal equipment.
Results come from consistency, not perfection.
Why Women Store Fat in Their Arms (And Why It’s Not Your Fault)
Your body stores fat differently than a man’s body.
Women carry 6-11% more body fat than men on average, and most of that difference sits in subcutaneous fat deposits (the layer stored directly under your skin) [1].
Estrogen plays a direct role in this. It signals your body to store fat in your hips, thighs, and upper arms as a biological priority tied to reproductive health.
After age 35, and especially during perimenopause and menopause, estrogen levels fluctuate and eventually decline.
This hormonal shift changes your fat storage pattern.
Upper arms become a more common fat depot for women over 40, which explains why many women notice flabby arms worsening with age even when their weight stays the same [2].
Genetics add another layer.
Your DNA determines where your body holds onto fat last and where it loses fat first.
Some women lose arm fat early in a weight loss phase. Others lose it last. You did not choose this pattern, and you cannot override it with willpower alone.
This is physiology, not a personal failing. Understanding this matters because it shapes realistic expectations for your arm toning timeline.
Before you start any workout plan, there is one thing nearly every article in this space gets wrong. The next section clears it up.
The Truth About “Spot Reducing” Arm Fat
You cannot burn fat from a specific body part by exercising that body part.
The spot reduction myth persists everywhere online, but controlled research has debunked it repeatedly.
A 2013 study published in the Journal of Strength and Conditioning Research had participants train only one leg for 12 weeks. Fat loss occurred across the entire body, with no preferential fat loss in the trained leg [3].
Your body pulls energy from fat stores based on genetics and hormones, not based on which muscle you worked that day.
So doing 200 tricep dips will not selectively melt fat off the back of your arms.
What actually works is body recomposition (losing fat while building muscle at the same time) through three combined strategies.
- You need strength training to build muscle underneath the fat.
- You need some form of cardio to increase your total calorie burn.
- And you need a modest calorie deficit so your body taps into fat stores for energy.
As your overall body fat percentage drops, your arms thin out too.
“But won’t lifting weights make my arms bulky?” No.
Women produce roughly 10-15 times less testosterone than men [4]. Testosterone is the primary hormone responsible for large muscle growth. Resistance training in women builds firmness and definition.
A 2012 review in Current Sports Medicine Reports found that women who strength trained 2-3 times per week gained lean muscle while reducing body fat, resulting in smaller, more defined limbs [5].
Strength training makes arms look more shaped and firm. It does not make them bigger.
Now you know what drives results. The next section covers exactly what you need to start.
What You Need Before You Start
You can begin with zero equipment. As you progress, adding resistance gives you more exercise options and better results through progressive overload (gradually increasing the challenge your muscles face over time).
- Level 1, Zero Equipment. Your own bodyweight works for all beginner exercises in this plan. Tricep dips, push-ups, arm circles, and plank variations require nothing.
- Level 2, Minimal Equipment. A set of resistance bands costs $10-15 and adds variety to bicep exercises, shoulder exercises, and overhead tricep extensions. Bands also reduce joint stress, making them a good option for arm fat women over 40.
- Level 3, Light Dumbbells. Beginners should start with 3-8 lb dumbbells. Intermediate lifters can use 8-15 lbs. A dumbbell arm workout allows the most precise progressive overload.
You need enough floor space to lie down and extend your arms in both directions. Each session takes 20-25 minutes. You will train 3 times per week.
One note on frequency. More is not better for arm training. Your muscles repair and grow during rest, not during the workout itself. Allow 48 hours of recovery between upper body workout sessions.
The exercises that make up the plan are next.
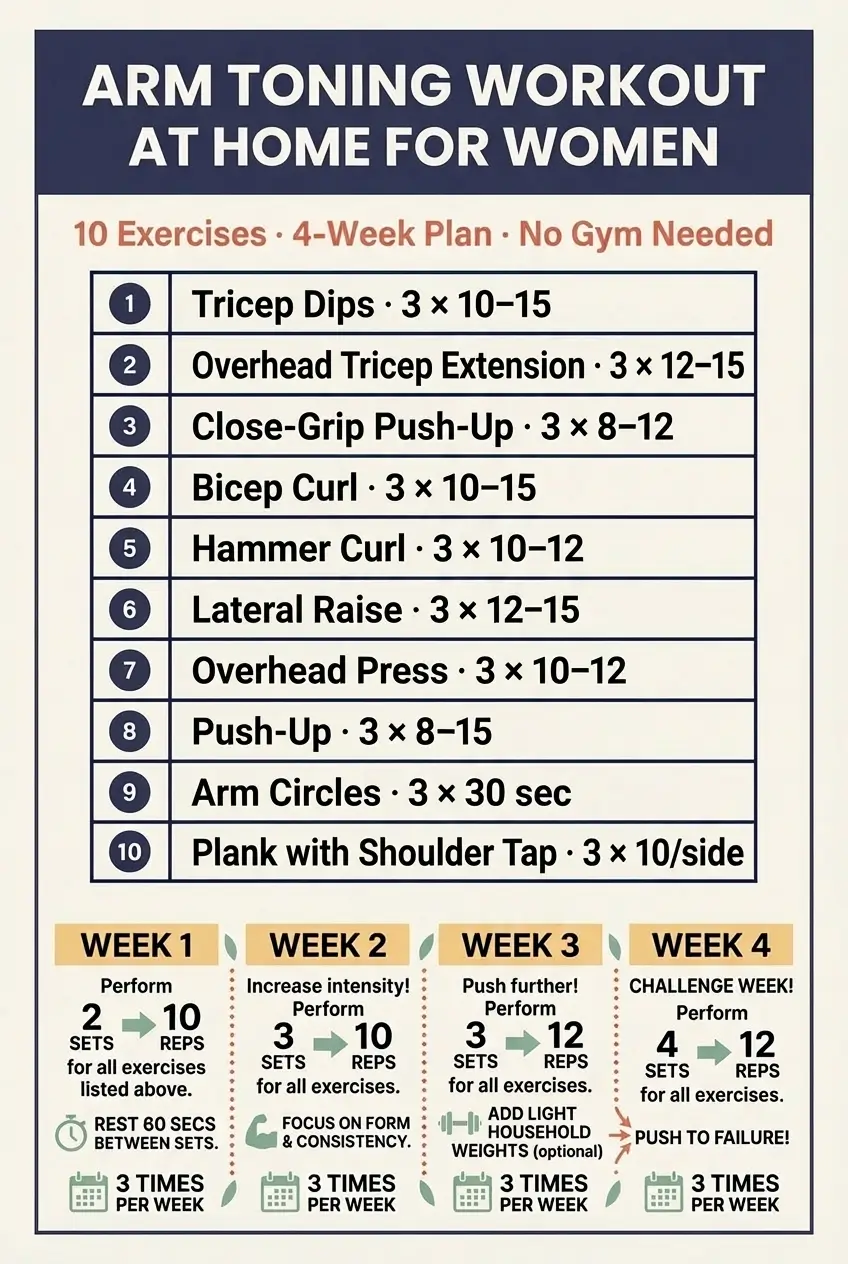
The 10 Best Arm Fat Exercises for Women at Home
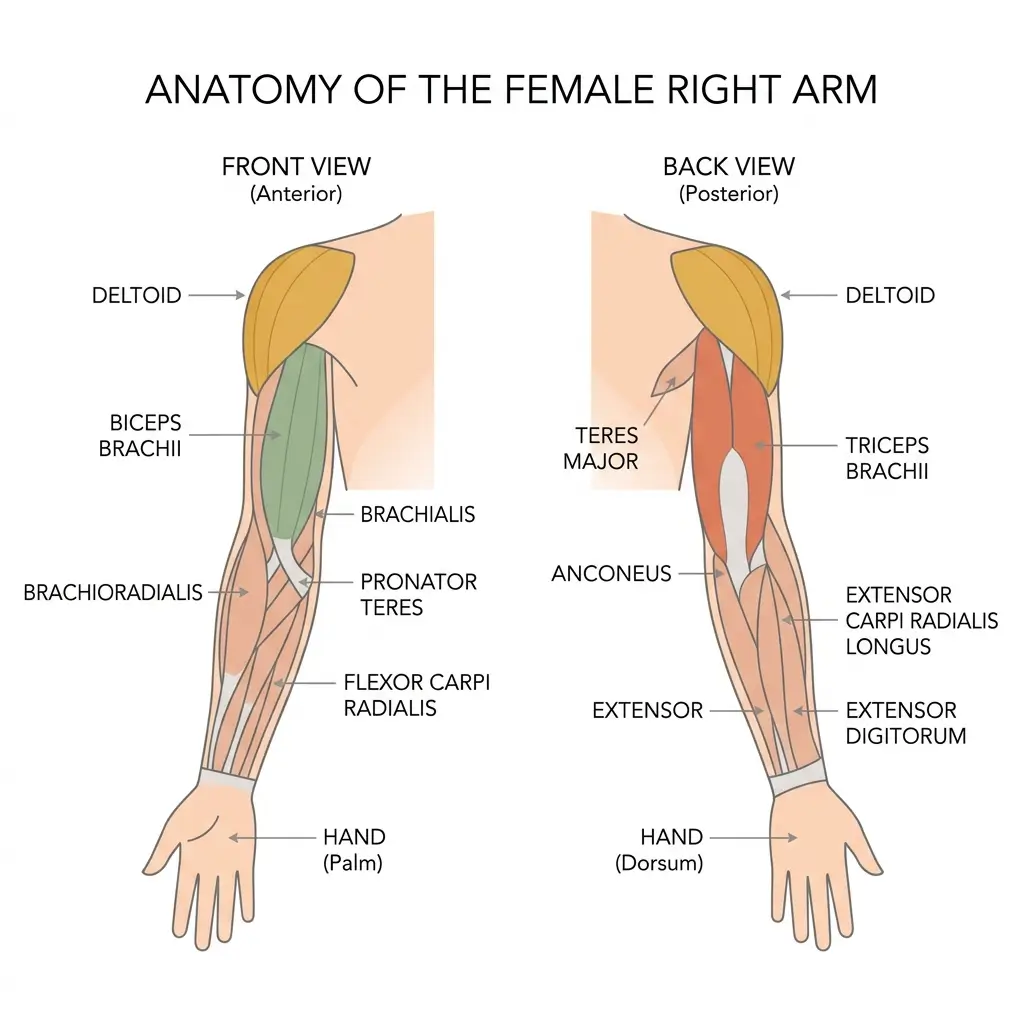
Each exercise below targets the muscles responsible for arm definition. Your triceps (back of the arm, the batwing zone) make up roughly two-thirds of your upper arm’s total muscle mass [6].
Your biceps shape the front. Your shoulders frame everything and create the visual proportion that makes upper arms appear leaner. Exercises are organized by muscle group so you can see exactly what each one does.
TRICEPS: Target the Batwing Area
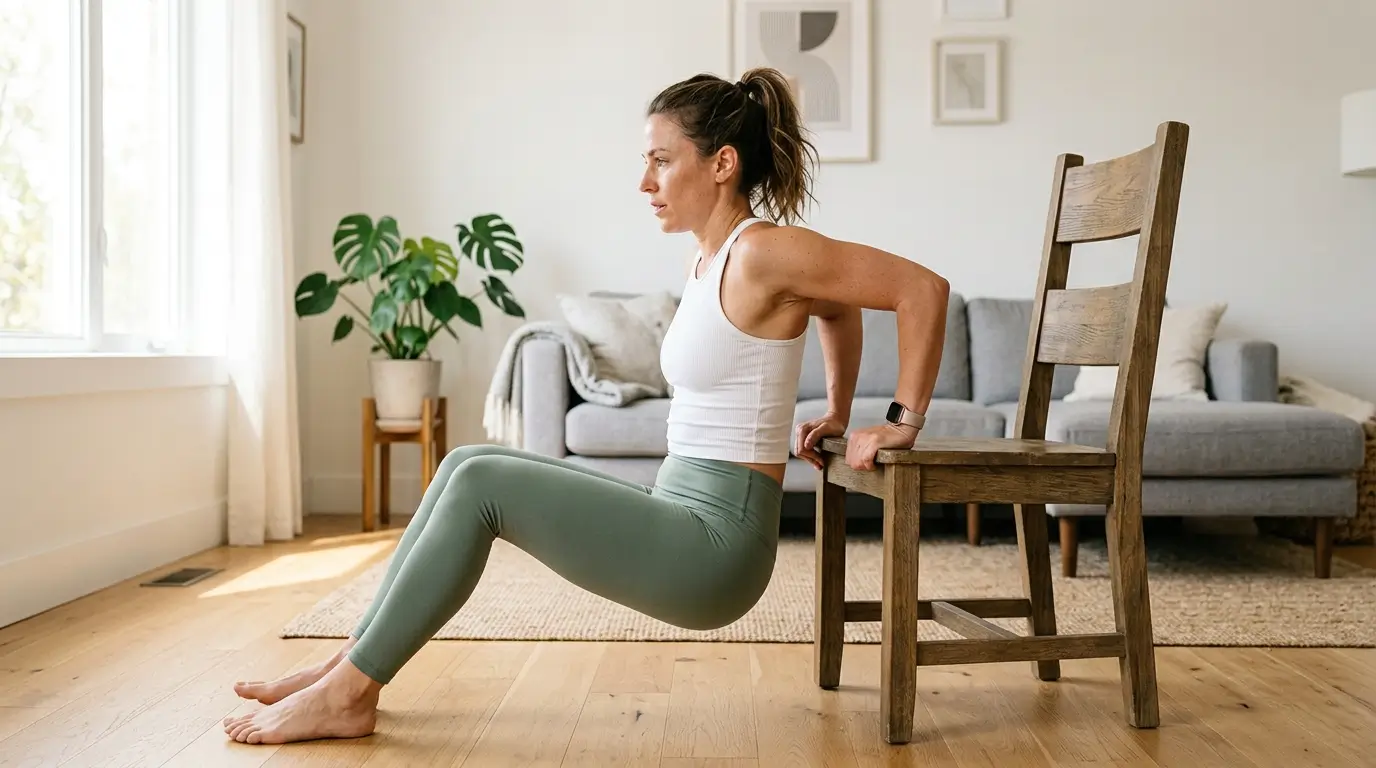
1. Tricep Dips (No Equipment)
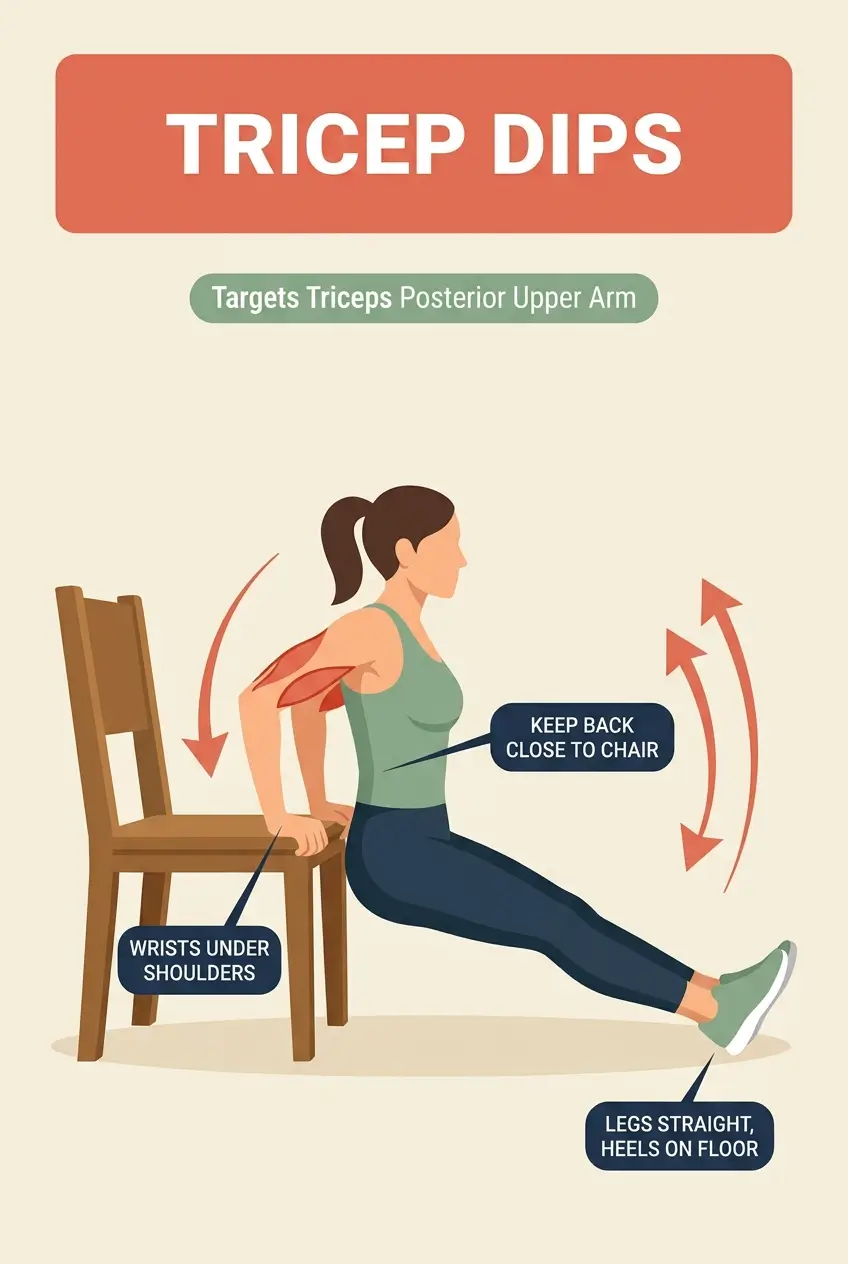
Targets. Triceps, posterior arm (batwing area).
How to do it.
- Sit on the edge of a sturdy chair, bench, or couch with your hands gripping the edge, fingers pointing forward
- Slide your hips off the seat and support your weight with your arms
- Lower your body by bending your elbows to roughly 90 degrees
- Press through your palms and straighten your arms to return to the top
- Keep your back close to the chair throughout the movement
Sets and reps. 3 sets of 10-15 reps.
Beginner modification. Bend your knees at 90 degrees to reduce the load on your arms. Straighter legs increase difficulty.
Common form mistake. Letting your elbows flare outward shifts work away from your triceps and into your shoulders. Keep elbows pointing straight behind you.
2. Overhead Tricep Extension (With or Without Dumbbell)
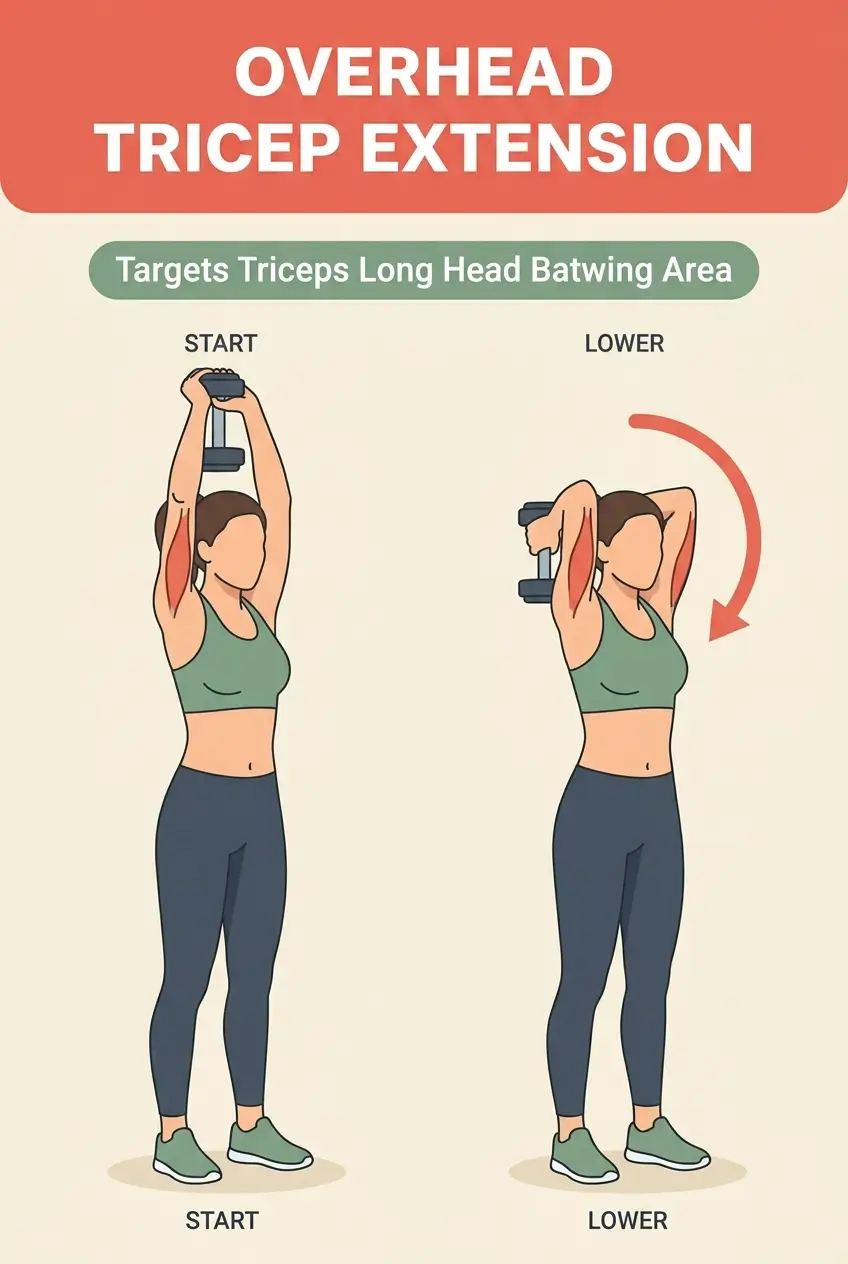
Targets. Long head of the tricep, the underarm area that contributes most to the batwing appearance.
How to do it.
- Stand or sit with your back straight
- Hold one dumbbell with both hands behind your head, elbows pointing toward the ceiling
- Extend your arms upward by straightening your elbows
- Lower the weight back behind your head with control
- Keep your upper arms stationary throughout
Sets and reps. 3 sets of 12-15 reps.
Modification. Use a water bottle, a resistance band anchored underfoot, or a backpack with books for resistance. Arm toning without weights is completely doable with household items.
Form cue. Keep your elbows pointed forward and close to your head. Flaring elbows reduces tricep activation.
3. Close-Grip Push-Up
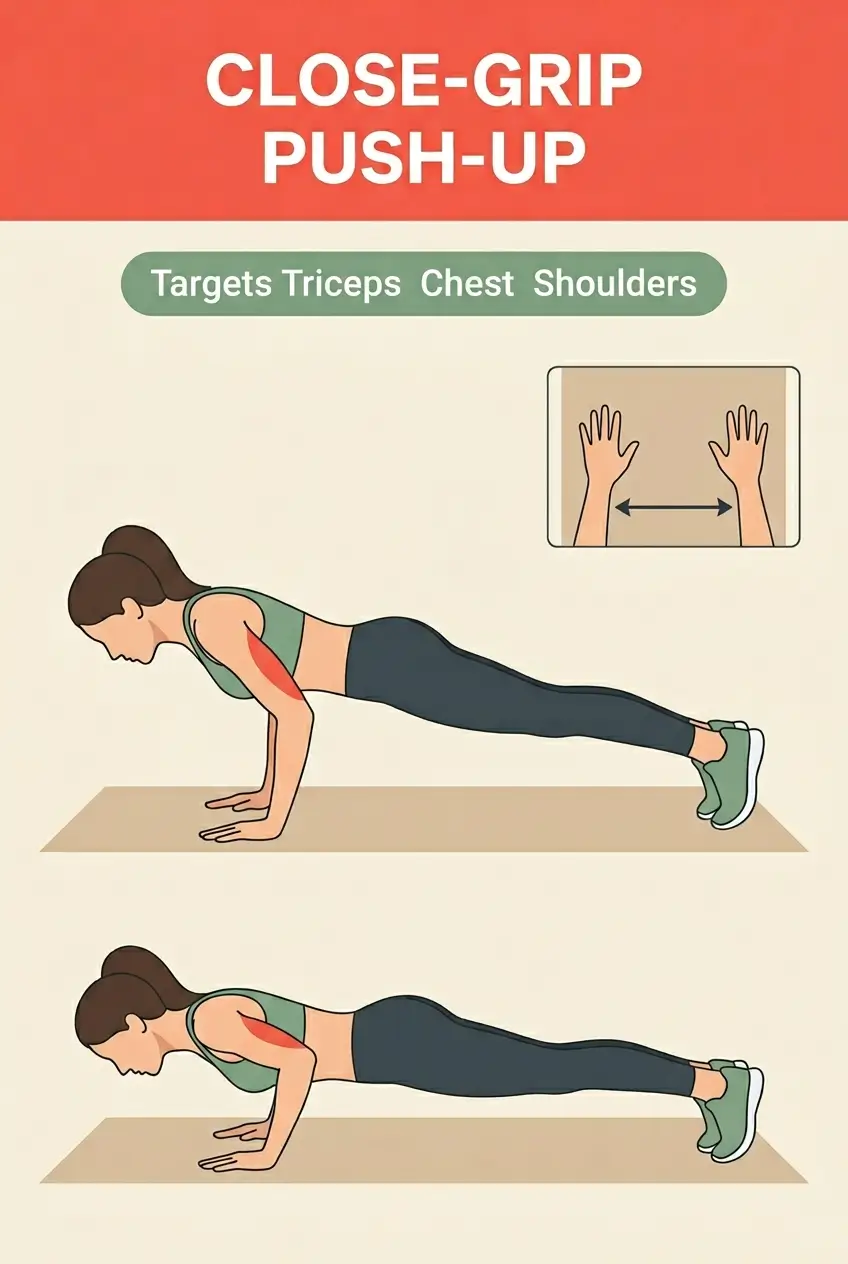
Targets. Triceps and chest.
How to do it.
- Start in a high plank position with your hands placed shoulder-width apart or slightly narrower
- Lower your chest toward the floor while keeping your elbows tucked against your sides
- Push back up to the starting position
- Maintain a straight line from your head to your heels throughout
Sets and reps. 3 sets of 8-12 reps.
Beginner modification. Drop to your knees. You still get strong tricep activation with reduced bodyweight load.
Form mistake. Placing hands too close together causes wrist strain. Shoulder-width is close enough to shift the focus onto your triceps.
BICEPS: Front of the Arm
4. Bicep Curl (Dumbbell or Resistance Band)
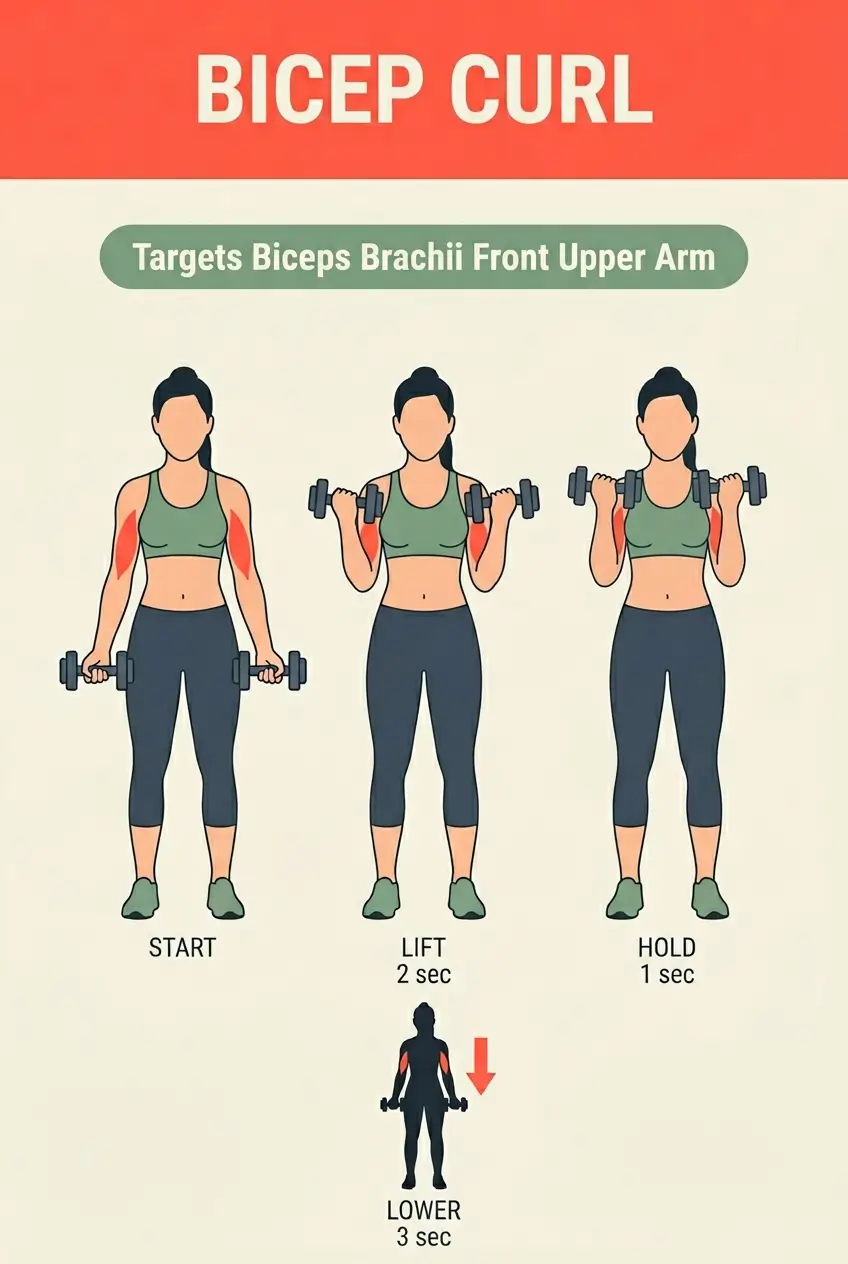
Targets. Biceps brachii, the front of your upper arm.
How to do it.
- Stand with feet hip-width apart, holding a dumbbell in each hand with palms facing forward
- Curl the weights up toward your shoulders over a count of 2 seconds
- Lower them back down over a count of 2 seconds
- Keep your elbows pinned to your sides throughout
Sets and reps. 3 sets of 10-15 reps each side.
Note on tempo. For beginners, controlled speed matters more than heavy weight. The 2-second up, 2-second down tempo keeps tension on the muscle longer, which drives better results with lighter loads.
5. Hammer Curl
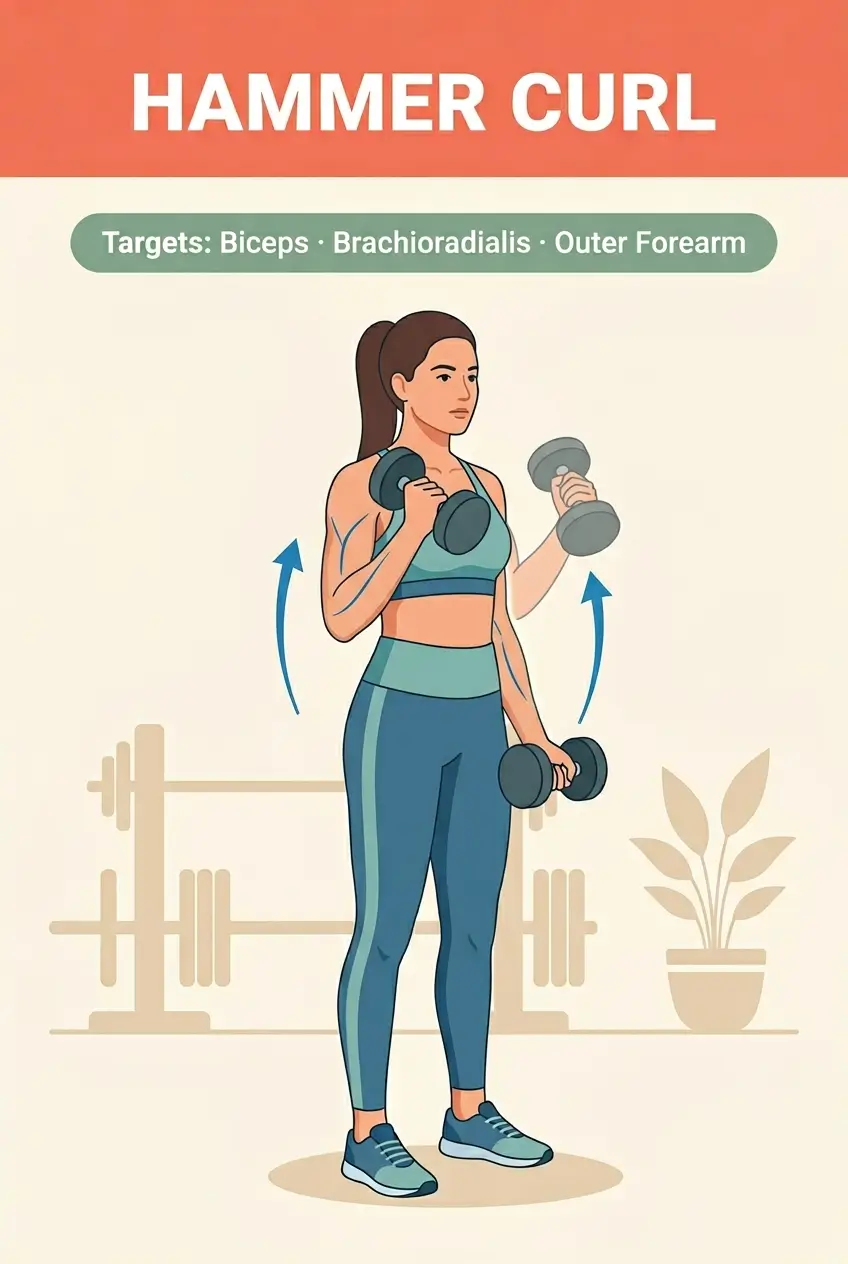
Targets. Biceps and brachioradialis (the outer bicep and forearm area).
How to do it.
- Stand holding dumbbells with a neutral grip, palms facing each other
- Curl both weights up simultaneously with control
- Lower slowly to the starting position
- Keep your wrists straight and elbows fixed at your sides
Sets and reps. 3 sets of 10-12 reps.
Why include it alongside standard curls? The hammer curl hits the bicep from a different angle and recruits more forearm muscle. This creates a fuller, more proportional arm shape that a standard curl alone does not produce.
SHOULDERS: Complete the Arm Shape
6. Lateral Raise
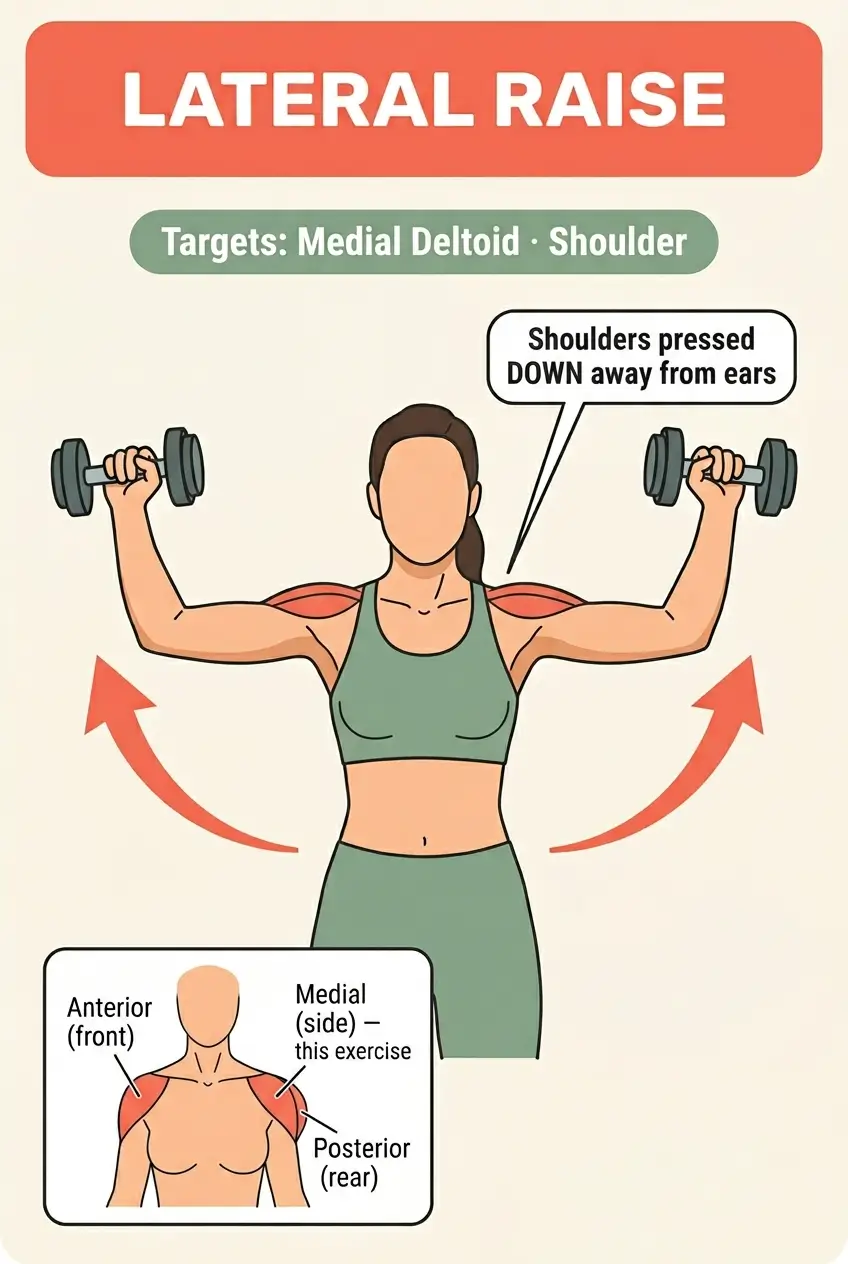
Targets. Medial deltoid. Building this muscle broadens your shoulder line slightly, which creates the visual effect of slimmer upper arms by improving proportion.
How to do it.
- Stand with light dumbbells or resistance bands at your sides
- Raise your arms out to the sides until they reach shoulder height
- Pause briefly at the top
- Lower with control over 2-3 seconds
Sets and reps. 3 sets of 12-15 reps.
Form mistake. Using momentum (swinging the weights up) or shrugging your shoulders toward your ears. Both reduce the work your deltoids perform. Use a lighter weight and move slowly.
7. Overhead Press
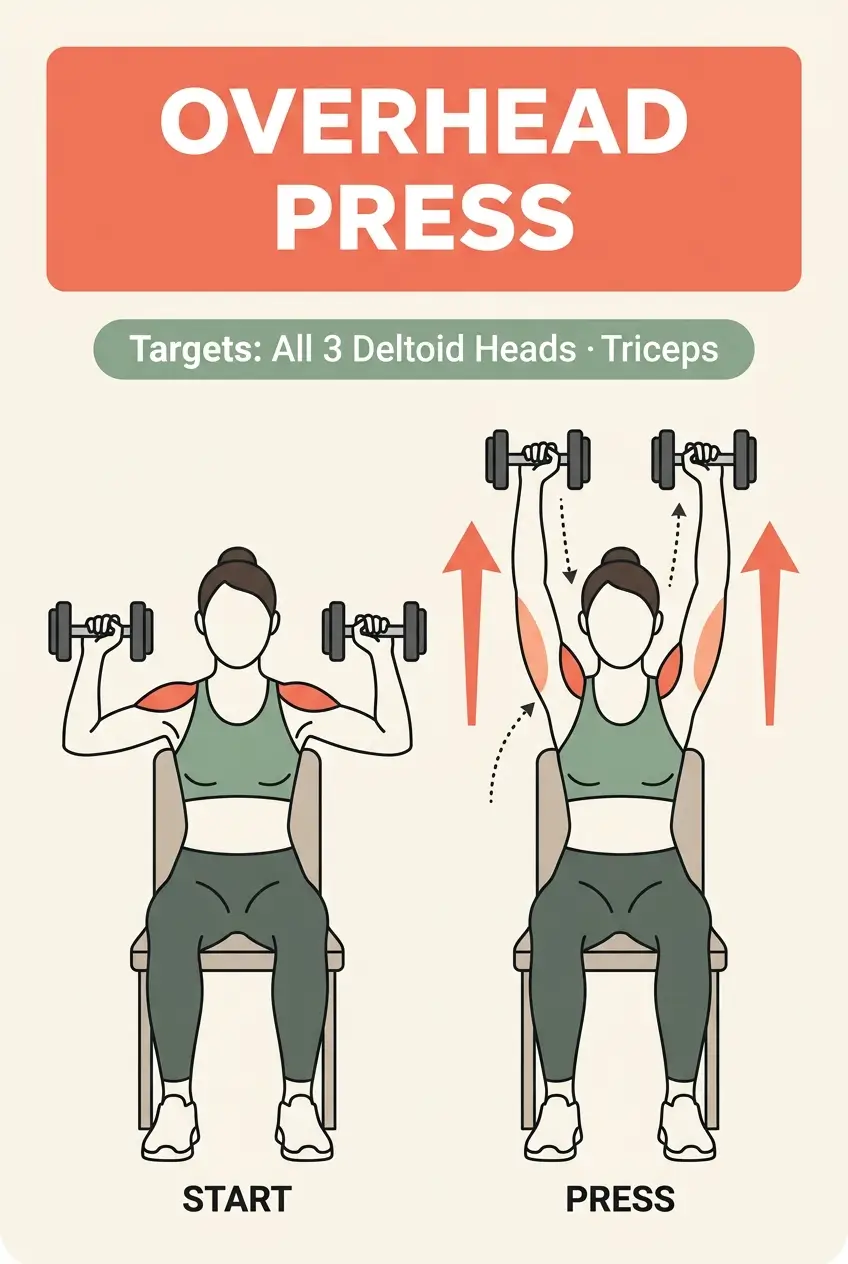
Targets. All three deltoid heads plus your triceps. This is the most efficient shoulder exercise in the plan.
How to do it.
- Hold dumbbells at shoulder height with palms facing forward
- Press the weights overhead until your arms are fully extended
- Lower back to shoulder height with control
- Brace your core throughout to protect your lower back
Sets and reps. 3 sets of 10-12 reps.
Modification. Perform seated on a chair for more stability. A resistance band looped under your feet works if you do not have dumbbells.
FULL-ARM COMPOUNDS: Maximum Efficiency
8. Push-Up (Standard)
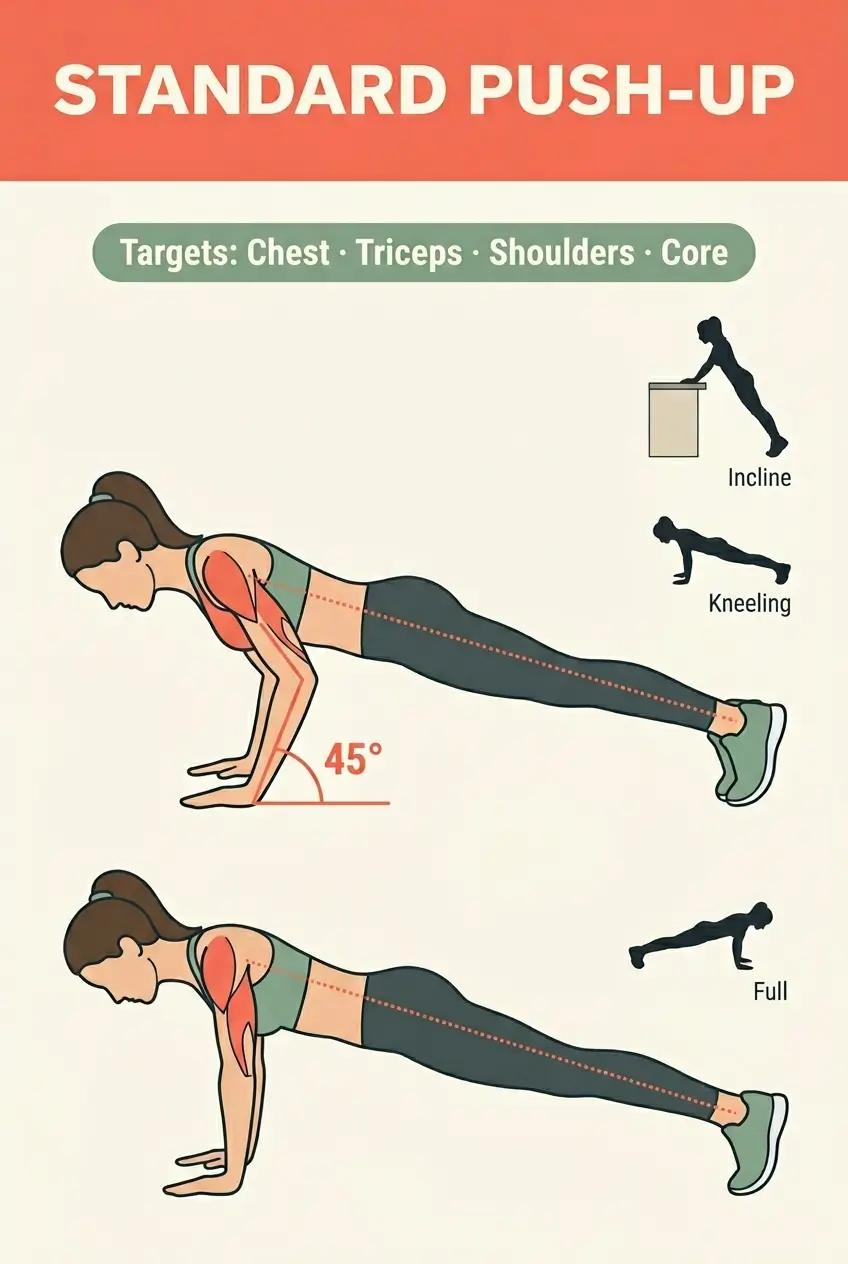
Targets. Chest, triceps, shoulders, and core. Push-ups work more arm muscles per rep than any other bodyweight exercise in this plan.
How to do it.
- Start in a high plank position with hands slightly wider than shoulder-width
- Lower your entire body as one unit until your chest nearly touches the floor
- Push through your palms to return to the starting position
- Keep your hips level. Do not let them sag or pike upward.
Sets and reps. 3 sets of 8-15 reps.
Modifications. Wall push-ups (easiest) remove roughly 60% of your bodyweight from the exercise. Incline push-ups on a counter or step are intermediate. Knees-down push-ups are the next progression before full push-ups.
9. Arm Circles

Targets. Shoulder muscles, deltoids, and rotator cuff.
How to do it.
- Stand with arms extended straight out to your sides at shoulder height
- Make small forward circles for 15 reps
- Reverse direction for 15 reps
- Then perform large circles in both directions
Sets and reps. 3 sets, 30 seconds each direction.
Arm circles work best as a warm-up before your session or as a finisher on active recovery days. They build muscular endurance in the shoulder girdle and raise your heart rate slightly. Do not dismiss them as too easy. Three sets with arms fully extended burns.
10. Plank with Shoulder Tap
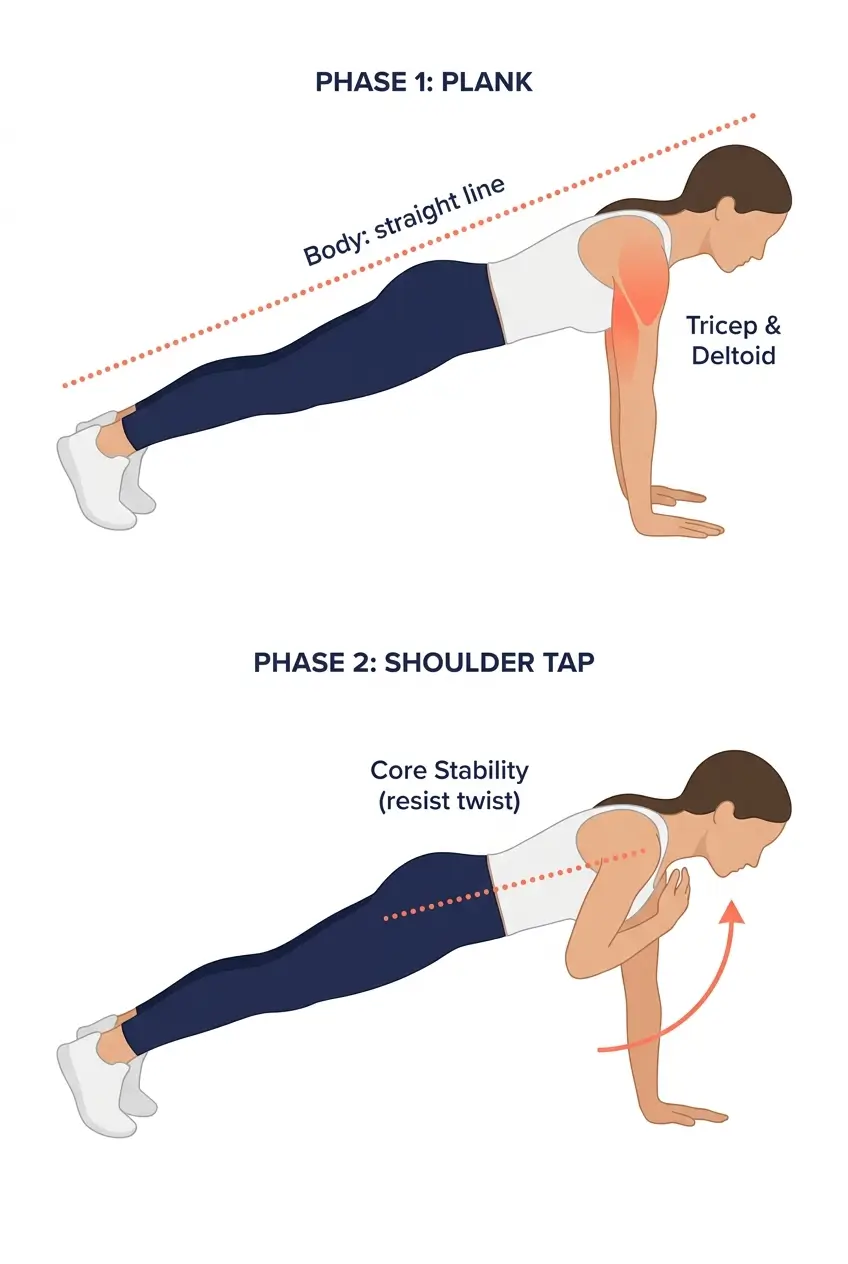
Targets. Triceps, shoulders, and core stability.
How to do it.
- Start in a high plank position with your hands directly under your shoulders
- Lift your right hand and tap your left shoulder
- Return your hand to the floor, then repeat on the opposite side
- Keep your hips square to the ground throughout. Resist the urge to rock side to side.
Sets and reps. 3 sets of 10 taps per side.
This exercise forces your triceps and shoulders to work under sustained load while also creating an forces your core to resist twisting. It burns more calories than a standard plank because of the added movement, making plank variations a strong addition to any upper body workout.
Now you have 10 exercises. The next section shows you how to structure them into a plan that produces measurable results over 4 weeks.
4-Week Arm Toning Workout Plan (At Home)
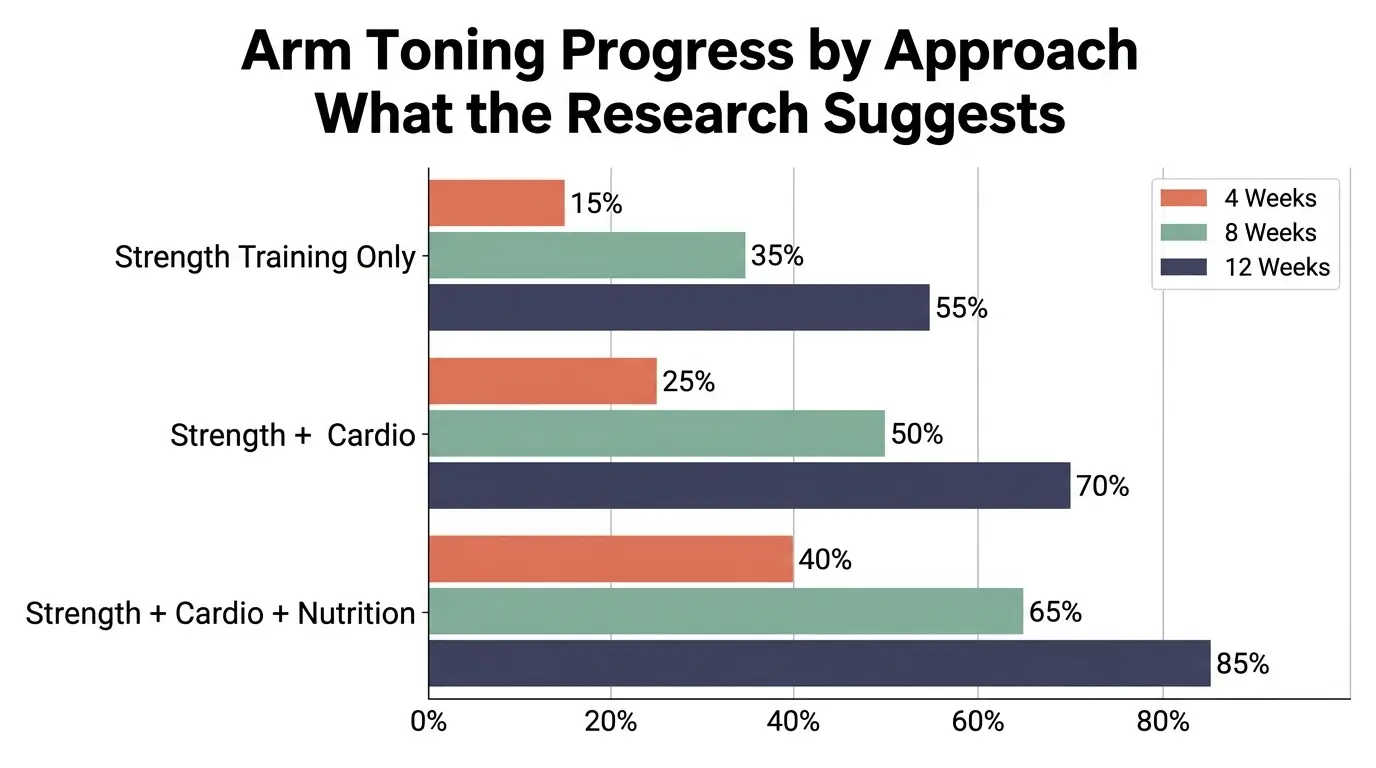
Train your arms 3 times per week. Monday, Wednesday, and Friday works well, but any schedule with at least one rest day between sessions is fine. Rest or do light cardio (walking, cycling) on off days. Each week adds one small progression, either more reps, an extra set, or heavier weight. This is progressive overload, and it is the reason this plan keeps working past week one.
Week 1: Foundation (2 sets per exercise, 10 reps)
| Day | Workout Focus | Exercises | Sets x Reps |
|---|---|---|---|
| Monday | Triceps + Shoulders | Tricep Dips, Overhead Press, Lateral Raise | 2 x 10 |
| Wednesday | Biceps + Full Arm | Bicep Curl, Push-Up, Arm Circles | 2 x 10 |
| Friday | Full Upper Body | Close-Grip Push-Up, Hammer Curl, Plank Shoulder Tap | 2 x 10 |
Week 2: Volume (3 sets per exercise, 10-12 reps)
Same exercises as Week 1. Add a third set to each exercise. Increase reps by 2 where possible. Your body is adapting to the movements, and this added volume keeps the stimulus moving forward.
Week 3: Intensity (3 sets, 12-15 reps OR increase resistance)
Swap one bodyweight exercise per session for a dumbbell or resistance band version. If you started tricep dips with bent knees, straighten your legs. If you used 3 lb dumbbells, move to 5 lbs. The goal is to make each session slightly harder than the week before.
Week 4: Challenge (Add one superset per workout)
A superset = two exercises performed back-to-back with no rest between them. Pair tricep dips with the overhead tricep extension. Pair bicep curls with push-ups. This increases time under tension (how long your muscles work during each set) and raises your calorie burn per session. Rest 60-90 seconds after completing each superset pair before repeating.
(Ed. note: Print or screenshot the Week 1 table and pin it where you work out. Having your plan visible eliminates guesswork and makes it far more likely you will follow through.)
Nutrition Basics That Support Arm Toning (Keep It Simple)
- You cannot out-exercise a calorie surplus. If you eat significantly more than you burn, fat will continue to cover the muscle you are building. But you also do not need to crash diet.
- A modest calorie deficit of 250-500 calories per day is enough to drive steady fat loss without sacrificing the muscle you are working to build. This translates to roughly 0.5-1 lb of fat loss per week, which falls within the sustainable range recommended by the CDC [7].
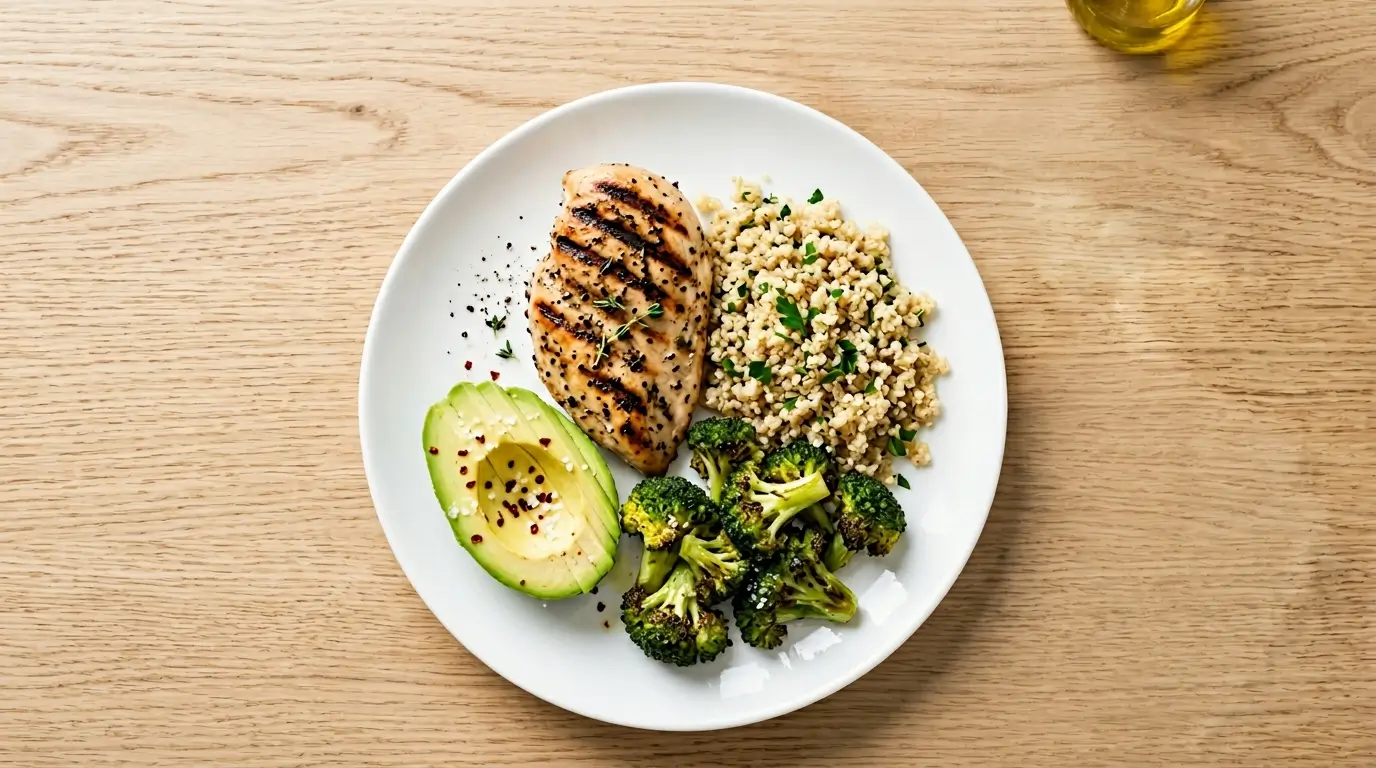
- Protein is your top nutritional priority during this plan. Aim for 0.7-1g of protein per pound of your bodyweight each day. Protein preserves lean muscle during a calorie deficit and supports recovery after training.
- For a 150 lb woman, that means 105-150g of protein daily. The USDA Dietary Guidelines recommend active women consume approximately 1,600-2,400 calories per day depending on age and activity level, with 10-35% of those calories coming from protein [8].
- Do not eliminate carbohydrates. They fuel your workouts. Focus on whole food sources like oats, rice, potatoes, and fruit. Cutting carbs too aggressively will leave you too fatigued to train with the intensity your arms need to change.
- Hydration matters more than most people realize. Even mild dehydration (as little as 2% body water loss) reduces exercise performance and slows muscle recovery [9].
- There is no specific “arm fat diet.” The goal is overall fat loss through a moderate calorie deficit paired with adequate protein. Keep it simple. Consistency with your nutrition matters more than finding the perfect plan.
Now that you know what to eat and how to train, here is what to expect in terms of timeline.
How Long Until You See Results?
“When will I actually notice a difference?” This is the question that matters most, and the honest answer depends on several factors.
- Weeks 1-2. You will feel stronger. Soreness decreases. Your form improves. No visible change yet, and that is completely normal.
- Weeks 3-4. Your arms begin to feel firmer to the touch. You may notice improved muscle activation during exercises, meaning you can feel your triceps and biceps working in a way you could not during week one.
- Weeks 6-8. Visible definition appears for many women, especially those maintaining a consistent calorie deficit alongside the training plan. Sleeveless tops start feeling less stressful.
- Weeks 10-12. Significant visible change for women who followed a 3x/week plan consistently. At a fat loss rate of 0.5-1 lb per week [7], you may have lost 5-12 lbs of total body fat by this point, and your arms will reflect that change.
Several variables affect your personal timeline.
- Your starting body fat percentage matters.
- Your age matters, as women over 40 may see slower visible change because of hormonal shifts in fat distribution.
- Your consistency with both training and nutrition matters.
- And your genetics determine where you lose fat last.
Some women lose arm fat within the first month. Others hold fat in their arms longer than anywhere else. That is biology, not failure.
If you follow the plan and maintain a calorie deficit, your body WILL reduce arm fat. The timeline simply varies.
Frequently Asked Questions
Quick-Reference Workout Summary (Pin This)
Train 3x per week. Rest 48 hours between sessions. Eat 0.7-1g protein per pound of bodyweight. Progress the difficulty every week. That is the entire system.
Save this plan. Twelve sessions over 4 weeks, 20 minutes each. Your arms will respond.
References
- [1] Karastergiou, K., Smith, S.R., Greenberg, A.S., & Fried, S.K. “Sex differences in human adipose tissues – the biology of pear shape” – Biology of Sex Differences, 2012 – DOI: 10.1186/2042-6410-3-13
- [2] Greendale, G.A., Sternfeld, B., Huang, M., Han, W., Karvonen-Gutierrez, C., & Karlamangla, A.S. “Changes in body composition and weight during the menopause transition” , JCI Insight, 2019, DOI: 10.1172/jci.insight.124865
- [3] Ramirez-Campillo, R., Andrade, D.C., Campos-Jara, C., et al. “Regional fat changes induced by localized muscle endurance resistance training” – Journal of Strength and Conditioning Research, 2013 – DOI: 10.1519/JSC.0b013e31827e8681
- [4] Torjesen, P.A. & Sandnes, L. “Serum testosterone in women as measured by an automated immunoassay and a RIA” – Clinical Chemistry, 2004 – 10.1373/clinchem.2003.027565
- [5] Westcott, W.L. “Resistance training is medicine: effects of strength training on health” – Current Sports Medicine Reports, 2012 – DOI: 10.1249/JSR.0b013e31825dabb8
- [6] Abe, T., Loenneke, J.P., & Thiebaud, R.S. “Morphological and functional relationships with ultrasound measured muscle thickness of the upper extremity and trunk” – Ultrasound (SAGE), 2014 – DOI: 10.1177/1742271X14554678
- [7] Centers for Disease Control and Prevention – “Losing Weight” – Accessed 2025
- [8] U.S. Department of Agriculture – “Dietary Guidelines for Americans, 2020-2025” – 2020
- [9] Cheuvront, S.N. & Kenefick, R.W. “Dehydration: physiology, assessment, and performance effects” – Comprehensive Physiology, 2014 – DOI: 10.1002/cphy.c130017
- [10] Layne, J.E. & Nelson, M.E. “The effects of progressive resistance training on bone density: a review” – Medicine & Science in Sports & Exercise, 1999 – DOI: 10.1249/00005768-199901000-00006