
How to Make Gluten Free Dough With Only 2 Ingredients (Recipe)
"Simple & Quick 2-Ingredient Gluten-Free Dough Recipe"

Making gluten-free dough doesn’t have to be complicated. In fact, I found a super easy way to do it with just two basic ingredients that are probably sitting in your kitchen right now. Since I know firsthand how hard it can be to avoid gluten, I wanted to pass along this simple recipe.
The best part is that you can use this dough for all sorts of things – bread, pizza, or even pastries. And honestly, if you’ve been missing regular baked goods while sticking to your gluten-free diet, this recipe is going to make your day.
So, let me walk you through how these two ingredients work together to make something pretty amazing.
Gluten Free Dough With 2 Ingredients Recipe
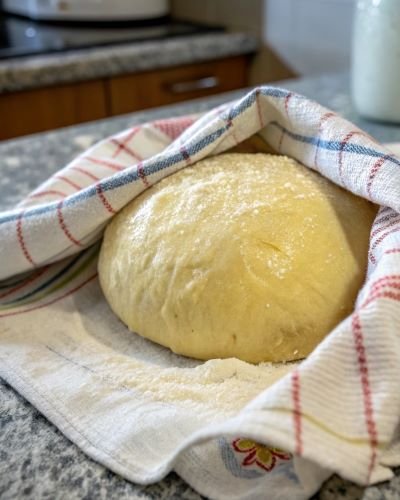
This super easy gluten-free dough that uses just 2 ingredients. You can use it for all sorts of things – pizza, flatbreads, you name it.
And the best part? It’s actually chewy, just like regular dough made with wheat. Look, it only takes about 15 minutes to make, and it’s enough to feed 4-6 people.
Equipment
| Amount | Equipment | Notes |
|---|---|---|
| 1 | Large mixing bowl | You’ll need one that holds at least 4 quarts |
| 1 | Measuring cups | These are essential for your dry ingredients |
| 1 | Stand mixer or hand mixer | Make sure it comes with a dough hook |
| 1 | Rolling pin | Best to use a non-stick or silicone-coated one |
| 2 | Baking sheets | Any regular-sized ones will do |
| 1 | Silicone baking mat or parchment paper | This goes on your baking sheets |
| 1 | Plastic wrap | You’ll use this to keep your dough fresh |
| 1 | Bench scraper | Perfect for cutting and portioning your dough |
Ingredients
- 2 cups (250g) of self-rising gluten-free flour
- 1.5 cups (360g) of Greek yogurt (it’s best to use full-fat)
How to Make
Making the Dough:
- First, put your Greek yogurt and gluten-free flour into a large mixing bowl.
- Then, combine these ingredients using a spatula until they’re roughly mixed.
- Next, get in there with your hands and work everything into a ball of dough.
- Keep kneading for about 2-3 minutes until it feels smooth and stretchy.
Resting and Preparation:
- Wrap the dough ball in plastic wrap.
- Now, let it sit at room temperature for 15 minutes.
- While you’re waiting, sprinkle some gluten-free flour on your counter.
- Once rested, put the dough on your floured surface.
- Then, cut the dough into 4 equal pieces.
Shaping the Dough:
- Roll each piece into a ball shape.
- Then, flatten each ball with your palm.
- Using a rolling pin, roll each piece until it’s about 1/4 inch thick.
- Finally, shape the dough however your recipe needs it.
Storage (if not using right away):
- Layer your shaped dough between sheets of parchment paper.
- Pop it into an airtight container.
- You can keep it in the fridge for up to 24 hours.
- Just remember to let it warm up to room temperature before using.
Recipe Notes
- Mix everything just until it comes together – too much mixing makes the dough tough.
- The ingredients work better when they’re at room temperature.
- For best results, weigh your ingredients instead of using measuring cups.
- Remember to cover the dough with plastic wrap or a damp cloth so it doesn’t dry out.
- If you’re freezing some for later, wrap each portion in plastic and pop them in a freezer bag.
- When you want to use frozen dough, let it thaw in the fridge overnight.
- To check if the dough is ready, press it gently with your finger – it should make a small dent that slowly bounces back.
Nutritional Facts
Looking for a simple gluten-free dough? This recipe uses just 2 ingredients and works well for anyone who can’t eat gluten or has celiac disease. While it doesn’t pack as much protein as regular wheat dough, it’s still packed with healthy complex carbs. Plus, since it’s naturally dairy-free, you can easily adjust it to fit other dietary needs.
Nutritional Facts (per serving – 1/4 cup)
| Nutrient | Amount | % Daily Value |
|---|---|---|
| Calories | 120 | – |
| Total Fat | 0.5g | 1% |
| Saturated Fat | 0g | 0% |
| Trans Fat | 0g | – |
| Cholesterol | 0mg | 0% |
| Sodium | 5mg | 0% |
| Total Carbohydrates | 28g | 10% |
| Dietary Fiber | 2g | 7% |
| Total Sugars | 0g | – |
| Added Sugars | 0g | 0% |
| Protein | 2g | 4% |
| Vitamin D | 0mcg | 0% |
| Calcium | 20mg | 2% |
| Iron | 0.8mg | 4% |
| Potassium | 45mg | 1% |
Frequently Asked Questions
Final Thoughts
Making gluten-free bread might look tricky at first, but once you get the hang of it and use the right stuff, you’ll be baking tasty bread at home easily.
You know, when it comes to special diets, it’s worth trying different gluten-free flour mixes until you find what works best for you. Just make sure you keep your gluten-free dough in a good spot and double-check those labels to make sure everything’s actually gluten-free.
Well, I think this recipe shows that gluten-free baking doesn’t have to be complicated – it can actually be quite fun. What do you think?
Check here for all Foodnourish’s recipes.